
“`html
If you’re craving a snack that’s crispy on the outside, tender and savory on the inside, and bursting with Brazilian flair, you must try this Brazilian Chicken Croquettes (Coxinhas) Recipe. These delightful drumstick-shaped treats are comfort food elevated — with a luscious chicken filling encased in a creamy potato dough, then fried to golden perfection. Once you master this recipe, these coxinhas will become your go-to for parties, family dinners, or whenever you want to impress with something truly special and soul-satisfying.
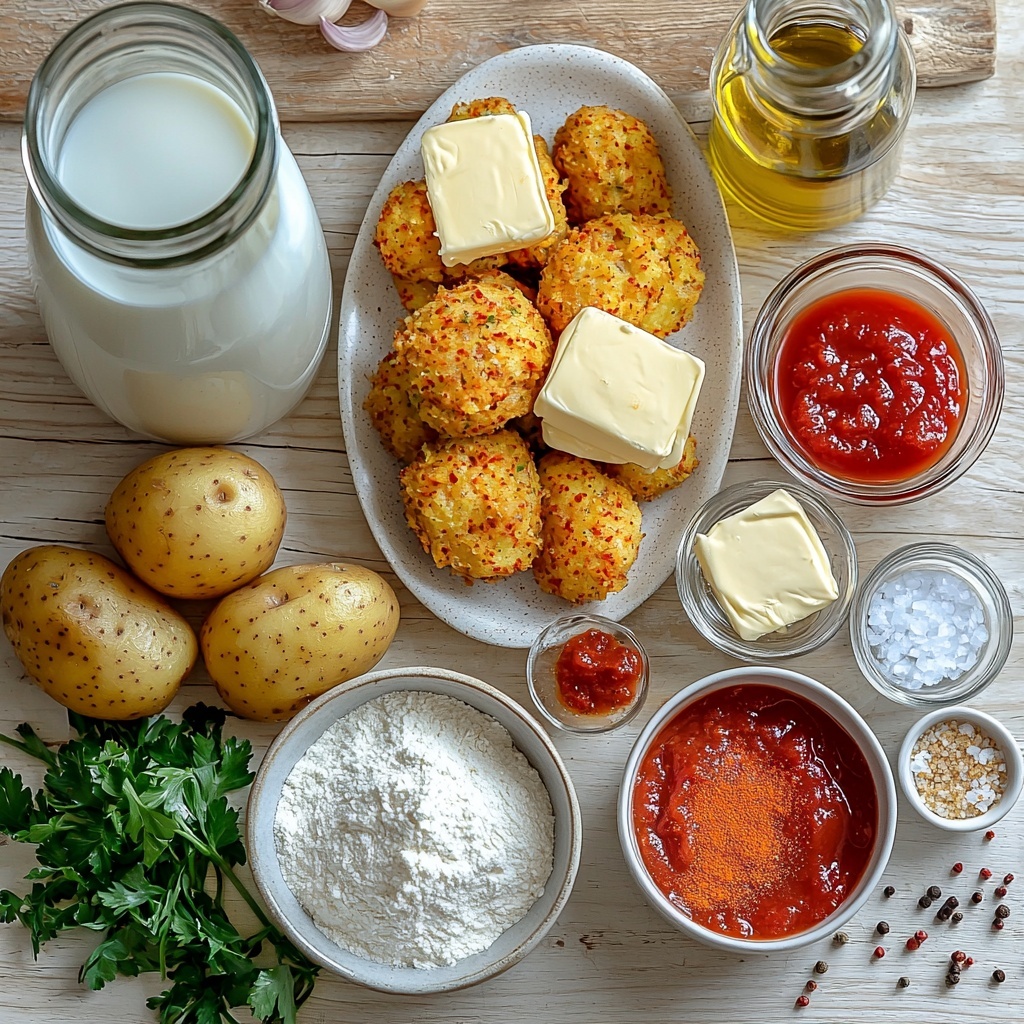
Ingredients You’ll Need
Getting your ingredients ready for this Brazilian Chicken Croquettes (Coxinhas) Recipe is refreshingly straightforward. Each one plays a crucial role, whether it’s lending richness, texture, or that signature savory flavor that makes coxinhas irresistible.
- Whole milk (1¾ cups): Brings creaminess and moisture to the dough for the perfect tender base.
- Chicken broth or water (1¾ cups): Adds depth to the dough and helps cook the potatoes smoothly.
- Salt (1 tablespoon): Essential for seasoning both dough and filling to enhance all the flavors.
- Butter (3½ tablespoons for dough + ¼ cup for filling): Offers richness and helps create a silky texture in dough and filling alike.
- Peeled and mashed potatoes (2 large, about 625 g): The secret to that soft, pillowy dough that holds the filling perfectly.
- All-purpose flour, sifted (3½ cups): Builds structure in the dough, allowing you to shape the coxinhas without fuss.
- Boneless, skinless chicken breasts (2 large, 300 g): Shredded finely to create a savory, juicy filling.
- Garlic (4 cloves, minced): Adds aromatic depth and warmth to the filling.
- Small onion (1, finely chopped): Gives sweetness and balance when sautéed with garlic.
- Paprika (1 tablespoon): Provides a gentle smoky flavor and a touch of color to the filling.
- Cream cheese (2 tablespoons): Enriches the filling with creaminess and smooth texture.
- Tomato sauce (4 tablespoons): Brings a subtle tang and moisture to marry the filling ingredients.
- Water (1 tablespoon): Helps bind the tomato sauce with the filling perfectly.
- Black pepper and salt (to taste): To season the filling just right.
- Fresh chopped parsley (to taste): Adds brightness and a fresh herbal note to the filling.
- Milk (½ cup, for breading): Used to help breadcrumbs stick, creating that irresistible crisp coating.
- Bread crumbs (as needed): For the crunchy outer shell that makes every bite a delight.
- Vegetable oil (for frying): The key for that golden, perfectly crispy exterior.
How to Make Brazilian Chicken Croquettes (Coxinhas) Recipe
Step 1: Cook and Shred the Chicken
Start by boiling the chicken breasts in water or chicken broth for about 10 minutes until tender and cooked through. After boiling, let the chicken rest for 5 minutes—this helps the meat stay juicy. Then, shred the chicken as finely as you can; the finer, the better for that traditional, melt-in-your-mouth filling texture. Don’t toss out the broth—reserve it to use in the dough later.
Step 2: Prepare the Flavorful Chicken Filling
In a pan, melt ¼ cup of butter and sauté the finely chopped onion for about 2 minutes until soft and fragrant. Add the minced garlic and cook for another 2 minutes to build a delicious aroma. Stir in paprika for its smoky touch, cream cheese and tomato sauce for creaminess and tang, and combine them well with the shredded chicken. Season with salt, pepper, and fresh parsley to taste. Allow this mixture to cool, so it firms up slightly and is easier to work with when filling your dough.
Step 3: Make the Dough
This step is magical—combine whole milk, reserved chicken broth, salt, butter, and mashed potatoes in a pot and bring to a boil. Gradually sift in the flour, stirring continuously to avoid lumps. Cook for 5 to 7 minutes, or until the dough is smooth, thick, and starts pulling away from the sides of the pot. Transfer it onto an oiled surface and knead gently until the texture is silky and smooth, then let it cool slightly so it’s easier to handle.
Step 4: Assemble and Shape the Coxinhas
Take a piece of dough about the size of a golf ball and flatten it, making sure the center is thicker than the edges. Place a generous spoonful of the chicken filling right in the middle. Carefully pinch the edges together to seal the filling inside, shaping the dough into a drumstick form—a classic coxinha shape. Keep the remaining dough covered with plastic wrap or a damp cloth to prevent it from drying out during the process.
Step 5: Bread the Croquettes
Dip each shaped coxinha into the milk to moisten the dough, then thoroughly coat it with bread crumbs. This double step ensures a beautiful golden crust once fried, locking in moisture and creating that iconic crunch everyone loves.
Step 6: Fry to Perfection
Heat vegetable oil in a deep pan to 350°F (175°C). Fry the coxinhas in batches to avoid crowding the pan, cooking each for about 3–4 minutes per side until perfectly golden brown and crisp on the outside. Transfer them to paper towels to drain excess oil. This frying step is what transforms your coxinhas from delicious dough balls into crispy, golden treasures.
Step 7: Serve and Enjoy
Serve your Brazilian Chicken Croquettes (Coxinhas) Recipe warm as a snack or appetizer. They’re absolutely perfect for sharing, and you’ll love watching everyone go back for seconds!
How to Serve Brazilian Chicken Croquettes (Coxinhas) Recipe
Garnishes
Sprinkle fresh chopped parsley over the coxinhas for a pop of color and fresh herbal flavor that complements the rich filling. A small side of spicy dipping sauce, like a zesty sriracha mayo or a tangy chimichurri, can elevate this dish even more and provide an exciting contrast.
Side Dishes
Pair your coxinhas with a crisp green salad dressed lightly with lime juice or a simple Brazilian vinaigrette for balance. Light rice dishes or black beans also make wonderful companions that echo the authentic flavors of Brazil without overpowering the coxinhas.
Creative Ways to Present
For parties, present coxinhas on a decorative platter with mini toothpicks for easy grabbing. You can serve them nestled in banana leaves to give a tropical, festive vibe. Or offer a trio of dipping sauces, inviting guests to personalize each bite and make the snack experience interactive and fun.
Make Ahead and Storage
Storing Leftovers
If you have leftovers, store the Brazilian Chicken Croquettes (Coxinhas) in an airtight container in the refrigerator. They keep beautifully for 3-4 days, and you’ll find their flavor actually deepens after resting overnight.
Freezing
To freeze, lay the shaped but un-fried coxinhas on a baking sheet lined with parchment paper and freeze until solid. Then transfer them to a freezer-safe bag or container. Frozen coxinhas will keep well for up to 1 month and make a wonderful make-ahead snack or appetizer that’s ready whenever the craving hits.
Reheating
For best results, reheat coxinhas in a preheated oven or air fryer at 350°F (175°C) until warmed through and crispy again, about 7–10 minutes. Avoid microwaving as it can make the crust soggy and detract from the signature crunch.
FAQs
Can I use leftover cooked chicken for the filling?
Absolutely! Leftover cooked chicken works wonderfully in this Brazilian Chicken Croquettes (Coxinhas) Recipe. Just make sure to shred it finely and mix it well with the filling ingredients before assembling.
Is there a gluten-free alternative for the flour and bread crumbs?
Yes, you can substitute the all-purpose flour with a gluten-free flour mix suitable for cooking, and use gluten-free bread crumbs for coating. Keep in mind the texture may vary slightly but the flavor will still shine.
Can these be baked instead of fried?
While frying gives that iconic crispy crust, you can bake coxinhas at 375°F (190°C) for about 25 minutes, turning halfway through. The texture will be less crispy but still tasty and a bit lighter.
What’s the secret to shaping the coxinhas perfectly?
The key is to keep the dough covered so it doesn’t dry out, and to ensure the filling is cool before shaping. Pinch edges tightly to seal and gently shape into a drumstick so it holds together during frying.
Can I add cheese to the filling?
Yes! Adding a bit of shredded mozzarella or catupiry cheese can make the filling even creamier and more indulgent, which many Brazilian recipes lovingly embrace.
Final Thoughts
There’s nothing quite like the joy of biting into freshly fried Brazilian Chicken Croquettes (Coxinhas) Recipe — the crunch giving way to a luscious, flavorful filling that feels like a warm hug from Brazil itself. Whether you’re making these for a festive occasion or a cozy night in, they’re sure to bring smiles and satisfied appetites. Trust me, once you try making them at home, coxinhas will quickly become one of your favorite comfort snacks to share with friends and family.
“`
Print
Brazilian Chicken Croquettes (Coxinhas) Recipe
- Prep Time: 30 minutes
- Cook Time: 45 minutes
- Total Time: 1 hour 15 minutes
- Yield: 12 servings
- Category: Appetizer
- Method: Frying
- Cuisine: Brazilian
Description
Brazilian Chicken Croquettes, known as Coxinhas, are savory, drumstick-shaped snacks featuring a creamy chicken filling enveloped in a smooth dough, breaded and deep-fried to golden perfection. This classic Brazilian appetizer combines tender shredded chicken with a flavorful mixture of spices and creamy ingredients, all wrapped in a soft, mashed potato-based dough that crisps up beautifully when fried.
Ingredients
Dough
- 1¾ cups whole milk (450 ml)
- 1¾ cups chicken broth or water (450 ml)
- 1 tablespoon salt
- 3½ tablespoons butter (50 g)
- 2 large peeled and mashed potatoes (625 g)
- 3½ cups sifted all-purpose flour (450 g)
Filling
- 2 large boneless, skinless chicken breasts (300 g)
- ¼ cup butter (½ stick)
- 4 cloves garlic, minced
- 1 small onion, finely chopped
- 1 tablespoon paprika
- 2 tablespoons cream cheese
- 4 tablespoons tomato sauce
- 1 tablespoon water
- Salt and black pepper, to taste
- Fresh chopped parsley, to taste
Breading and Frying
- ½ cup milk (for breading)
- Bread crumbs (as needed)
- Vegetable oil (for frying)
Instructions
- Cook Chicken: Boil the chicken breasts in water or chicken broth for about 10 minutes until cooked through. Remove and let rest for 5 minutes, then shred the chicken finely. Reserve the broth to use in the dough preparation.
- Prepare Filling: In a skillet, sauté the finely chopped onion in ¼ cup butter for 2 minutes until translucent. Add the minced garlic and cook for an additional 2 minutes. Stir in paprika, cream cheese, tomato sauce, shredded chicken, salt, black pepper, and fresh chopped parsley. Mix thoroughly and let cool completely to set the filling.
- Make Dough: In a large pot, combine whole milk, reserved chicken broth, salt, butter, and mashed potatoes; bring to a boil. Gradually add sifted all-purpose flour while stirring continuously until a smooth dough forms that pulls away from the sides of the pot (approximately 5–7 minutes). Transfer the dough onto an oiled surface. Allow it to cool slightly, then knead it gently until smooth and pliable.
- Shape Coxinhas: Divide the dough into golf ball-sized portions. Flatten each piece with a thicker center to hold the filling. Place a spoonful of the cooled chicken filling in the center, pinch the edges tightly to seal the filling inside, and shape into a traditional drumstick form. Keep the dough covered with a cloth to prevent drying as you work.
- Bread the Coxinhas: Dip each shaped coxinha into milk, then thoroughly coat it with breadcrumbs ensuring an even layer for optimal crispiness.
- Fry: Heat vegetable oil in a deep fryer or large pot to 350°F (175°C). Fry coxinhas in batches for 3 to 4 minutes per side or until they achieve a golden, crispy exterior. Use a slotted spoon to remove and drain on paper towels to remove excess oil.
- Serve: Serve the coxinhas warm as a delicious snack or appetizer, perfect for gatherings and celebrations.
Notes
- You can use chicken broth instead of water for a richer dough flavor.
- Make sure to keep the dough covered while shaping to prevent it from drying and cracking.
- Adjust seasoning in the filling according to taste; adding a pinch of cayenne can add a spicy kick.
- Ensure oil temperature remains steady at 350°F (175°C) for even frying and crispy texture.
- Leftover coxinhas can be reheated in an air fryer or oven to maintain crispiness.
