“`html
If you’re craving a Halloween treat that’s as fun to make as it is to eat, look no further than the Witch Finger Cookies: Spooky Italian Treats Made Easy Recipe. These eerie yet delicious cookies perfectly blend buttery sweetness with bright lemon notes and a touch of strawberry jelly, offering a uniquely festive bite that brings a little spooky magic to any occasion. With their charmingly creepy almond “fingernails” and crisp texture, they’re bound to impress both kids and adults alike, making your kitchen the go-to place for Halloween delights.
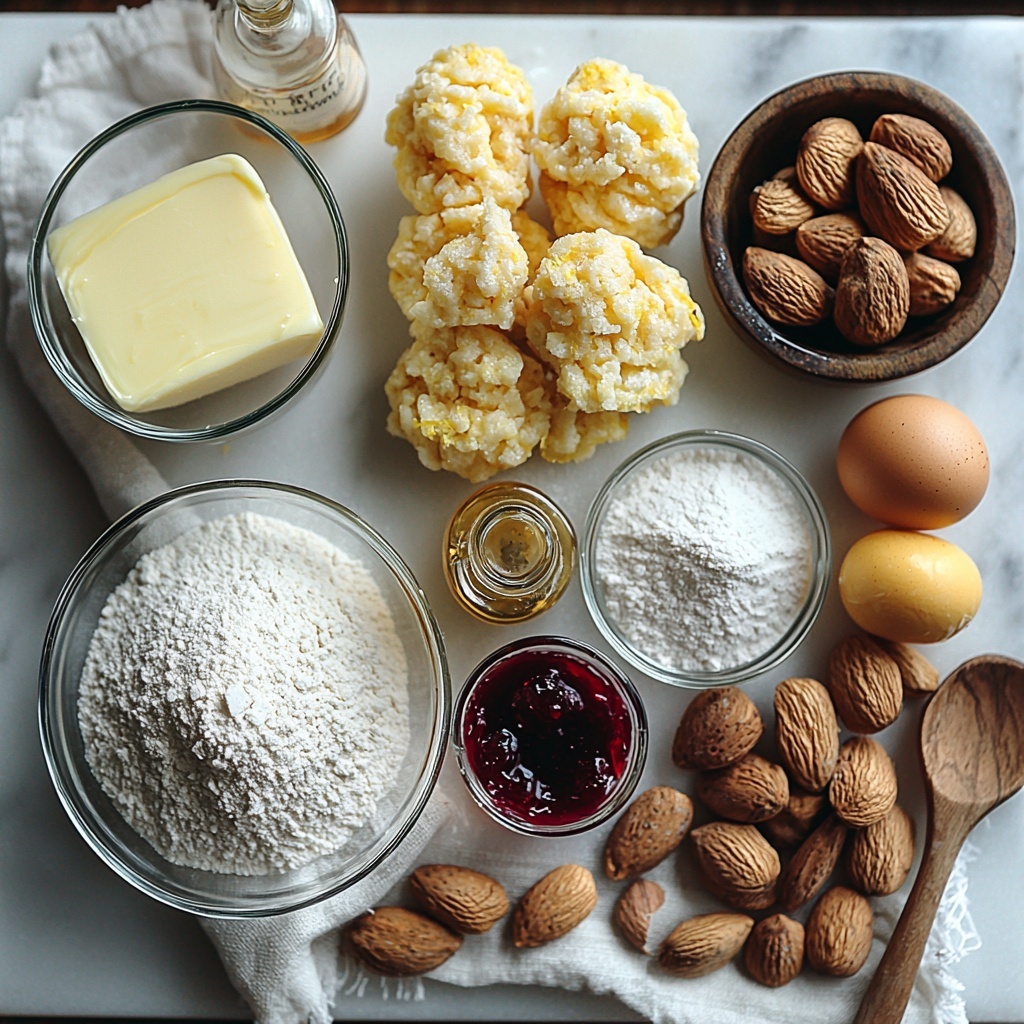
Ingredients You’ll Need
Keeping it simple is the secret to these unforgettable cookies. Each ingredient plays a starring role, from the rich butter that ensures a tender crumb to the zesty lemon that wakes up your palate. The sugar sweetens, the egg yolks bring everything together with creaminess, and that sprinkling of salt perfectly balances the flavors.
- 125 grams Butter: Adds richness and moisture; substitute with margarine for a dairy-free option.
- 240 grams Granulated Sugar: Provides sweetness and contributes to the cookie’s delightful texture; no substitutions recommended.
- 5 number Egg Yolks: Acts as a binder, enriching the dough; do not substitute, but use leftover whites for other recipes.
- 2 teaspoons Vanilla Extract: Enhances flavor; opt for pure vanilla extract for the best results.
- ¾ teaspoon Lemon Extract: Brightens up the flavors; can swap with additional vanilla if lemon is unavailable.
- 400 grams All-Purpose Flour: Forms the structure of the cookies; for gluten-free, use a 1:1 gluten-free flour blend.
- 1 teaspoon Salt: Balances sweetness and enhances flavor; should always be included.
- 1 number Lemon Zest: Adds fresh citrus notes; can use orange zest for a twist.
- 3 tablespoons Strawberry Jelly: Sweet filling that adds flavor; raspberry or other red preserves work too.
- 48 number Almonds: Used for “fingernails” on the cookies; substitute with pecans or maraschino cherries for a fun variation.
How to Make Witch Finger Cookies: Spooky Italian Treats Made Easy Recipe
Step 1: Prepare Your Baking Space and Dry Ingredients
Start by lining a baking sheet with parchment paper — this little step keeps your cookies from sticking and helps them bake evenly. Then, whisk together the flour and salt in a bowl; this ensures the salt is distributed well throughout the dough for balanced flavor with each bite.
Step 2: Cream Butter and Sugar
Using a stand mixer, cream the butter and granulated sugar until the mixture is light and fluffy, about 3 minutes. This step is crucial because it traps air, giving your cookies that lovely tender texture we love.
Step 3: Add Egg Yolks and Extracts
One by one, mix in the egg yolks, making sure to scrape down the bowl so everything is evenly combined. Then stir in the vanilla and lemon extracts — these add a beautiful layer of fragrant flavor that makes these cookies truly special.
Step 4: Mix Dry Ingredients and Lemon Zest
Gradually add your flour and salt mixture along with the lemon zest. Mix just until combined — overmixing can make cookies tough, and we want these to remain delightfully tender with subtle citrus brightness throughout.
Step 5: Shape the Witch Fingers
Scoop out the dough and roll it into logs about 3 to 4 inches long. Pinch the dough in a few spots to create the appearance of knuckles, then use a knife or utensil to create creases for added realism. Gently press an almond at one end to form the nail — this is the moment your cookies start transforming into those spooky fingers!
Step 6: Chill if Needed
If your dough feels warm or soft, pop the shaped cookies into the fridge for about 15 minutes. This little chill time helps the cookies keep their shape while baking, so your witch fingers come out perfectly creepy and defined.
Step 7: Bake and Add the Final Touch
Preheat your oven to 375°F (190°C). Bake the cookies on your lined sheet for around 20 minutes, or until their bottoms are lightly browned – an indicator they’re baked through but still tender inside. Once cooled, carefully remove the almonds, place a small dollop of strawberry jelly inside the nail cavity, and replace the almond back to seal in that sweet surprise.
How to Serve Witch Finger Cookies: Spooky Italian Treats Made Easy Recipe
Garnishes
For an extra spooky touch, dust your cookies lightly with powdered sugar to mimic a ghostly powdery effect. You can even add a drizzle of melted dark chocolate along the fingers’ creases to give them an eerie look that’s as tasty as it is scary.
Side Dishes
These cookies pair wonderfully with a warm cup of spiced apple cider or a creamy hot chocolate. The warmth of the drinks balances the crispness of the cookies, creating a cozy Halloween pairing that everyone will adore.
Creative Ways to Present
Serve your Witch Finger Cookies on a dark or wooden serving platter to enhance their eerie vibe. Place them arranged as if they are crawling out of a pumpkin bucket or scattered across cobweb-decorated trays for an unforgettable presentation that’s perfect for parties.
Make Ahead and Storage
Storing Leftovers
Store leftover Witch Finger Cookies in an airtight container at room temperature, and they will stay fresh and delicious for 3-4 days. This keeps the cookies crisp without letting the moisture soften them too quickly.
Freezing
You can freeze unbaked shaped dough by wrapping it tightly in plastic wrap and placing it in a freezer-safe container for up to one month. When ready, thaw overnight in the fridge before baking. Baked cookies also freeze well—store them in an airtight container with parchment layers between to prevent sticking, and enjoy them within a month for best quality.
Reheating
To bring back that fresh-baked feeling, warm your cookies in a preheated oven at 325°F (163°C) for 5-7 minutes. Avoid microwaving as it can make them soggy, but the oven will crisp them right back up while melting the jelly slightly for an irresistible bite.
FAQs
Can I use whole eggs instead of just yolks?
For this recipe, egg yolks are essential because they provide richness and help with the texture. Using whole eggs might change the cookie’s consistency. However, you can save the leftover whites for meringues or pancakes!
Do I have to use lemon extract and zest?
The lemon extract and zest give the cookies a bright, fresh flavor that cuts through the sweetness beautifully. If you don’t have lemon, you can substitute with additional vanilla extract or orange zest for a slightly different but equally delicious twist.
Can I make these cookies dairy-free?
Yes! Simply substitute the butter with margarine or a plant-based butter alternative. This swap keeps the cookies moist and rich while accommodating dairy-free diets.
What if I’m allergic to almonds?
You can absolutely switch almonds for pecans or even maraschino cherries for the “fingernail” topping. Each alternative will give your cookies a different look and flavor, so feel free to experiment!
How long do these cookies last if refrigerated?
These cookies are best kept at room temperature for 3-4 days. Refrigeration can sometimes dry them out unless they’re stored very tightly sealed. For longer storage, freezing is the recommended option.
Final Thoughts
Witch Finger Cookies: Spooky Italian Treats Made Easy Recipe isn’t just a clever name — it’s a celebration of flavors and festive fun on your plate. Whether you’re baking them with kids, surprising party guests, or adding a handmade touch to your Halloween celebration, these cookies bring joy and a little bit of spooky magic. Trust me, once you try this recipe, it’ll become your go-to for every spooky season ahead!
“`
Print
Witch Finger Cookies: Spooky Italian Treats Made Easy Recipe
- Prep Time: 15 minutes
- Cook Time: 20 minutes
- Total Time: 45 minutes
- Yield: 24 servings
- Category: Dessert
- Method: Baking
- Cuisine: Italian
Description
Witch Finger Cookies are a festive and spooky Italian treat perfect for Halloween. These buttery cookies shaped like fingers, complete with almond ‘fingernails’ and a touch of strawberry jelly, combine delightful texture and rich flavors made easy with simple ingredients.
Ingredients
Cookie Dough
- 125 grams Butter (Adds richness and moisture; substitute with margarine for a dairy-free option.)
- 240 grams Granulated Sugar (Provides sweetness and contributes to the cookie’s delightful texture; no substitutions recommended.)
- 5 Egg Yolks (Acts as a binder, enriching the dough; do not substitute, but use leftover whites for other recipes.)
- 2 teaspoons Vanilla Extract (Enhances flavor; opt for pure vanilla extract for the best results.)
- ¾ teaspoon Lemon Extract (Brightens up the flavors; can swap with additional vanilla if lemon is unavailable.)
- 400 grams All-Purpose Flour (Forms the structure of the cookies; for gluten-free, use a 1:1 gluten-free flour blend.)
- 1 teaspoon Salt (Balances sweetness and enhances flavor; should always be included.)
- 1 Lemon Zest (Adds fresh citrus notes; can use orange zest for a twist.)
Decorations
- 3 tablespoons Strawberry Jelly (Sweet filling that adds flavor; raspberry or other red preserves work too.)
- 48 Almonds (Used for “fingernails” on the cookies; substitute with pecans or maraschino cherries for a fun variation.)
Instructions
- Prepare Baking Sheet: Line a baking sheet with parchment paper to prevent sticking and ensure even baking throughout the cooking process.
- Combine Dry Ingredients: In a bowl, whisk together the all-purpose flour and salt to evenly distribute the salt and prepare the dry mixture.
- Cream Butter and Sugar: In a stand mixer, beat the butter and granulated sugar together until the mixture is light and fluffy, which typically takes about 3 minutes, incorporating air for a tender cookie.
- Add Egg Yolks and Extracts: Incorporate the egg yolks one at a time into the creamed butter mixture, scraping down the sides of the bowl between additions, then stir in the vanilla and lemon extracts to flavor the dough.
- Mix Dry Ingredients with Zest: Gradually add the flour and salt mixture along with the lemon zest to the wet ingredients, mixing just until combined to avoid overworking the dough.
- Shape Cookies: Scoop out portions of dough and form them into logs about 3-4 inches long. Pinch the dough in several places to create knuckle shapes and press gently to form creases for a realistic finger appearance. Press an almond gently into one end of each log to serve as a fingernail.
- Chill Dough if Needed: If the dough becomes too soft or warm, chill the shaped cookies in the refrigerator for about 15 minutes to help them hold their shape during baking.
- Preheat Oven: Preheat your oven to 375°F (190°C) to ensure it reaches the correct temperature before baking.
- Bake Cookies: Place the shaped cookies on the prepared baking sheet and bake them for approximately 20 minutes, or until the bottoms are lightly browned and the cookies are set.
- Add Jelly Fingernails: After the cookies have cooled completely, carefully remove each almond ‘fingernail,’ place a small dollop of strawberry jelly into the cavity, and replace the almond on top to create the signature spooky look.
Notes
- To make these cookies dairy-free, substitute butter with margarine or a plant-based butter alternative.
- Leftover egg whites can be saved and used for meringues or other recipes.
- For a gluten-free version, replace all-purpose flour with a 1:1 gluten-free flour blend.
- You can substitute the lemon extract with more vanilla extract if unavailable.
- Try different nuts like pecans or use maraschino cherries instead of almonds for unique variations of the fingernails.
- Chilling the dough helps maintain shape, especially in warmer kitchens.
- Ensure cookies cool completely before adding jelly to prevent melting or spreading.


