
If you’re dreaming of a refreshing treat perfect for those sun-soaked afternoons, look no further than Snow Cones: The Amazing Ultimate Recipe for Summer Delight Recipe. This vibrant, icy wonder is not just a cool dessert but a joyful celebration of flavor and texture that transforms simple crushed ice into a carnival of taste with bright syrups and optional luscious toppings. Whether you’re beating the heat or just craving something fun and colorful, this recipe is your go-to for a burst of sweetness and chill in every bite.
Ingredients You’ll Need
The beauty of this Snow Cones: The Amazing Ultimate Recipe for Summer Delight Recipe lies in its simplicity. Each ingredient plays a crucial role: the crushed ice provides that essential icy crunch, the sugar and water form a perfect syrup base, and your flavored syrup adds the personality and pop of color. Keeping the ingredients straightforward lets the final product shine as a perfect balance of cold and sweet.
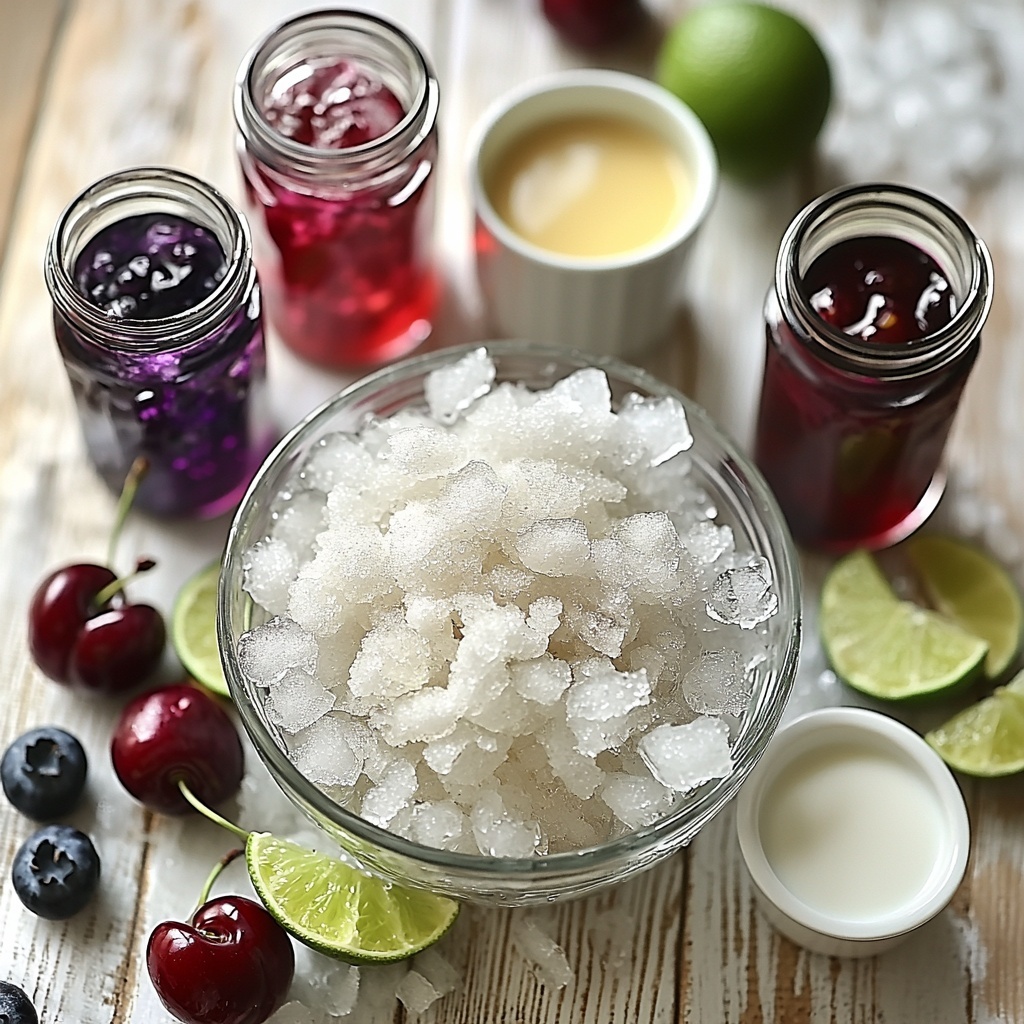
- Crushed ice: This is the foundation of your snow cones—finely crushed ice creates the characteristic fluffy texture.
- 1 cup granulated sugar: Essential for making a smooth and sweet syrup that will soak into the ice.
- 1 cup water: Balances the sugar to make a syrup that’s not too thick or too thin.
- 1 cup flavored syrup (e.g., cherry, blueberry, lime): Adds vibrant color and signature flavor to your snow cone.
- Optional: Fresh fruit slices for garnish: These bring freshness and visual appeal.
- Optional: Condensed milk for drizzling: Adds a rich, creamy layer that complements the tangy syrup beautifully.
How to Make Snow Cones: The Amazing Ultimate Recipe for Summer Delight Recipe
Step 1: Prepare the Ice
Start by getting that perfect snow-like texture. Use either a snow cone machine or a blender to crush the ice finely. The magic of the snow cone comes from the delicate, fluff-like crunch of this perfectly crushed ice, so don’t rush this step—smooth, fine texture guarantees a delightful mouthfeel.
Step 2: Make the Syrup
Next, it’s all about creating the sweet base. In a small saucepan, combine the granulated sugar and water and gently heat them over medium flame while stirring consistently. Keep at it until the sugar fully dissolves into a clear syrup—this step ensures your flavors don’t get grainy and the syrup coats the ice evenly.
Step 3: Add Flavoring
Once your syrup is ready, stir in your chosen flavored syrup or fruit juice. This is where your snow cone really takes on its personality—from tart lime to juicy blueberry, pick the flavor that excites your taste buds. Let the mixture cool to room temperature so it will soak into the ice properly without melting it.
Step 4: Fill the Cups
Time for some hands-on fun! Spoon the crushed ice into paper cones or sturdy cups and gently pack it down. You want the ice packed enough to hold its shape but still fluffy enough to absorb the syrup and keep its icy texture.
Step 5: Drizzle Syrup
Now for the best part—pouring your flavored syrup generously over the packed ice. Make sure every inch is coated so each spoonful is bursting with flavor and sweetness. This step brings the dessert alive with vibrant colors and refreshing taste.
Step 6: Optional Toppings
Enhance the experience by adding fresh fruit slices for a natural pop of color and flavor or drizzle some condensed milk for an irresistibly creamy twist. These touches take your snow cone from simple to spectacular, making it a perfect summer indulgence.
Step 7: Serve Immediately
Snow cones are best enjoyed fresh! Serve right away to savor the ideal combination of chill and sweetness before the ice melts. This final step ensures every bite lives up to the promise of Snow Cones: The Amazing Ultimate Recipe for Summer Delight Recipe’s fresh and fun spirit.
How to Serve Snow Cones: The Amazing Ultimate Recipe for Summer Delight Recipe
Garnishes
Fresh fruit slices like lemon, lime, or berries add a refreshing contrast and gorgeous visual appeal, making your snow cones look as inviting as they taste. A drizzle of condensed milk not only adds creaminess but also a rich sweetness that complements the tangy syrups beautifully.
Side Dishes
Pair your snow cones with light summer snacks like fresh fruit salad, cool cucumber sandwiches, or simple popcorn. These sides keep the meal fun and light, ensuring the snow cone remains the star of your summer delight spread.
Creative Ways to Present
Serve your snow cones in colorful paper cones for a nostalgic carnival vibe or in small clear cups layered with bits of fruit and condensed milk for a gourmet twist. Adding edible flowers or colorful straws can elevate the presentation, making these treats as eye-catching as they are delicious.
Make Ahead and Storage
Storing Leftovers
If you happen to have any leftovers, keep them stored in an airtight container in the freezer for up to 3-4 days. The texture won’t be quite the same as fresh, but freezing preserves those flavors and prevents the ice from melting prematurely.
Freezing
You can freeze the syrup separately in a sealed container for several weeks. When ready to serve, just crush fresh ice and combine it with thawed syrup to enjoy that fresh-made taste without the prep time.
Reheating
Snow cones are best enjoyed cold, so reheating isn’t recommended. Instead, if the syrup thickens in storage, simply stir it gently to bring back its smooth consistency before drizzling over fresh ice.
FAQs
Can I use fresh fruit juice instead of flavored syrup?
Absolutely! Fresh fruit juice works wonderfully and adds a natural, vibrant flavor, though it may be less sweet than commercial syrups. Adjust sugar in your syrup accordingly for balanced taste.
What type of ice works best for snow cones?
Finely crushed or shaved ice is key. Large ice cubes won’t absorb the syrup well and can make the texture less enjoyable, so use a snow cone machine or blender to get that perfect fluffy texture.
Is condensed milk necessary for snow cones?
No, it’s entirely optional. Condensed milk adds a creamy sweetness that some love, but plain syrup or fresh fruit toppings can also create delicious variations.
How long can I store homemade syrup?
Your homemade syrup will keep well in the refrigerator for up to one week when stored in a sealed container, making it easy to whip up snow cones on short notice.
Can kids make their own snow cones?
Definitely! Making snow cones is a fun, hands-on activity for kids. Just be sure to supervise when using the snow cone machine or hot syrup, and encourage them to explore different flavors and toppings.
Final Thoughts
There’s something truly magical about Snow Cones: The Amazing Ultimate Recipe for Summer Delight Recipe—the way it cools you down, brings a smile, and fills your senses with color and flavor. Whether you’re sharing with friends or treating yourself, this recipe is a surefire way to brighten any hot day. So grab your ingredients, get creative, and dive into the joyful world of snow cones—you won’t regret it!
Print
Snow Cones: The Amazing Ultimate Recipe for Summer Delight Recipe
- Prep Time: 10 minutes
- Cook Time: 15 minutes
- Total Time: 25 minutes
- Yield: 4 servings
- Category: Dessert
- Method: Stovetop
- Cuisine: American
Description
This ultimate snow cone recipe is a perfect summer treat, featuring finely crushed ice drenched in sweet, flavored syrup. Quick to prepare and customizable with your favorite fruity flavors and optional toppings like fresh fruit slices or condensed milk, these snow cones are a refreshing delight for hot days.
Ingredients
Ice
- Crushed ice (enough for 4 snow cones)
Syrup
- 1 cup granulated sugar
- 1 cup water
- 1 cup flavored syrup (e.g., cherry, blueberry, lime)
Optional Toppings
- Fresh fruit slices for garnish
- Condensed milk for drizzling
Instructions
- Prepare the Ice: Use a snow cone machine or blender to crush the ice into a fine, snow-like consistency that will absorb the syrup well.
- Make the Syrup: In a small saucepan, combine granulated sugar and water. Heat over medium heat, stirring constantly until the sugar fully dissolves to create a clear syrup base.
- Add Flavoring: Stir in your chosen flavored syrup or fruit juice into the sugar syrup. Allow the mixture to cool to room temperature to prevent melting the ice prematurely.
- Fill the Cups: Spoon the crushed ice into paper cones or cups, gently packing it down to form a mound that can hold the syrup effectively.
- Drizzle Syrup: Generously pour the prepared flavored syrup over the crushed ice until it is well coated and flavorful throughout.
- Optional Toppings: Enhance your snow cones by adding fresh fruit slices on top or drizzling condensed milk for a creamy richness.
- Serve Immediately: Enjoy your snow cones right away to savor the best texture and temperature before the ice starts melting.
Notes
- Use a snow cone machine for the best texture or a high-powered blender if that’s not available.
- Adjust the sweetness of the syrup by varying the amount of sugar or choosing different flavored syrups.
- For a fun twist, try adding different flavors layered into one snow cone.
- Serve immediately as the ice will melt quickly.
- Store leftover syrup in the refrigerator for up to a week.


