
If you are looking for a delightful treat that combines rich flavor with a fun, bite-sized form, this Red Velvet Cake Balls Recipe is absolutely for you. These little gems capture the deep, velvety taste of red velvet cake rolled into perfect, creamy morsels coated in smooth white chocolate. Whether it’s for a party, a holiday celebration, or simply a special indulgence, these cake balls are as charming as they are scrumptious, delivering a burst of sweetness in every bite.
Ingredients You’ll Need
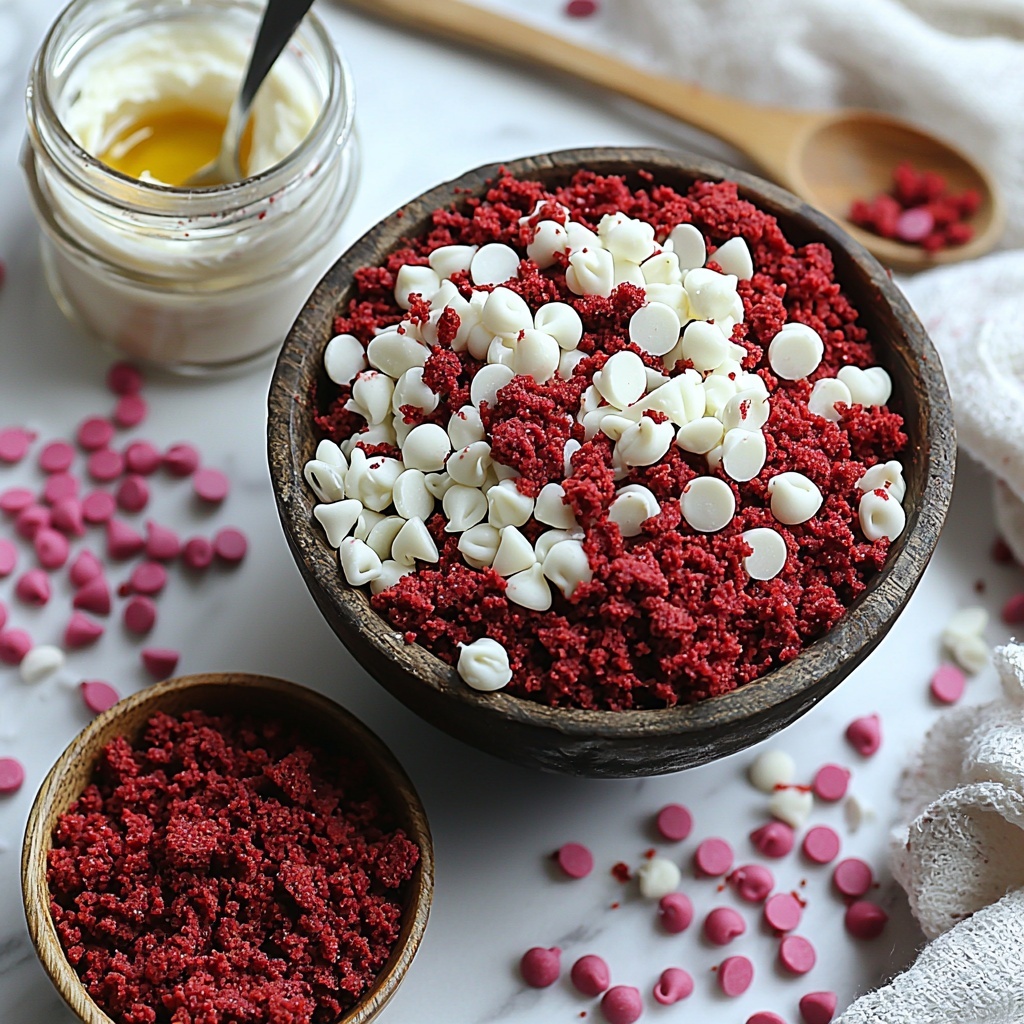
Gathering the right ingredients is key to making these cake balls shine. Each one has a special role, from providing vibrant color to ensuring the perfect moist and creamy texture.
- 3 cups crumbled red velvet cake: The star of the show, offering that signature cocoa flavor and gorgeous red hue.
- 3/4 cup cream cheese frosting: Adds smooth creaminess and a luscious tang that complements the cake.
- 2 cups white chocolate chips: Creates a luscious, sweet coating that hardens beautifully around each ball.
- 1 teaspoon coconut oil or shortening (optional): Helps the white chocolate melt smoothly and gives a glossy finish.
- Red velvet crumbs or sprinkles (optional, for garnish): Gives a festive, textured look and a hint of extra flavor on top.
How to Make Red Velvet Cake Balls Recipe
Step 1: Combining Cake and Frosting
Start by gently mixing your crumbled red velvet cake with the cream cheese frosting. The goal is to have a dough-like consistency that holds together without being overly sticky, perfectly blending that rich, tangy frosting into every crumb.
Step 2: Rolling into Perfect Spheres
Next, roll the mixture into 1-inch balls using your hands or a small scoop. This size is ideal for an effortless bite and consistent baking sheet arrangement. Place each ball on a parchment-lined baking sheet to keep them from sticking.
Step 3: Chilling for Firmness
Pop those tray-bound cake balls into the refrigerator for about 30 minutes. This chilling step is crucial for firming them up, making the dipping process afterward much cleaner and easier to handle.
Step 4: Melting the White Chocolate Coating
While your cake balls chill, gently melt the white chocolate chips with the optional coconut oil or shortening. Using low heat or a double boiler ensures the chocolate melts evenly into a smooth, glossy coating perfect for dipping.
Step 5: Dipping Cake Balls in Chocolate
Once chilled, carefully dip each cake ball into the melted white chocolate. Use a fork or dipping tool to submerge and cover them fully. Tap off any excess chocolate and place them back on the baking sheet to set.
Step 6: Garnishing for Extra Flair
Before the chocolate hardens, sprinkle on red velvet crumbs or colorful sprinkles. This final touch not only elevates the visual appeal but also adds a bit of bite and texture contrast.
Step 7: Setting and Serving
Allow the chocolate coating to harden completely, either at room temperature or chilled. Once set, your red velvet cake balls are ready to delight, best enjoyed chilled or at room temperature for ultimate flavor and texture.
How to Serve Red Velvet Cake Balls Recipe
Garnishes
Adding garnishes is a wonderful way to personalize your cake balls. Try finely chopped nuts, edible glitter, or a light dusting of cocoa powder. These touches can elevate the presentation while enhancing taste and texture.
Side Dishes
Pair these cake balls with fresh berries or a light fruit salad to balance their rich sweetness. A hot cup of coffee or a creamy latte also complements the velvety chocolate, making your dessert moment complete.
Creative Ways to Present
For a fancy gathering, serve your cake balls in mini cupcake liners or arrange them on a tiered dessert stand. You can also skewer them like cake pops for easy handling and a festive look. Wrapping them individually in cellophane ties makes perfect party favors!
Make Ahead and Storage
Storing Leftovers
Keep any leftover cake balls in an airtight container in the refrigerator. They stay fresh for up to a week, making them an ideal treat you can enjoy a little at a time.
Freezing
If you want to prepare in advance or save some for later, freeze the cake balls on a baking sheet first, then transfer them to a sealed freezer bag. They can last up to three months, perfect for a ready-to-go dessert option.
Reheating
Since these are best served chilled or at room temperature, avoid microwaving. To thaw frozen cake balls, simply move them to the fridge overnight or leave at room temperature for about an hour before serving.
FAQs
Can I use store-bought cake and frosting for this recipe?
Absolutely! Using store-bought cake and frosting is a great shortcut that still delivers fantastic flavor, especially when you choose quality options. Homemade versions work great too if you prefer to bake from scratch.
What if I want to use a different coating instead of white chocolate?
You can substitute the white chocolate chips with milk or dark chocolate according to your preference. Just ensure to melt them carefully and add a bit of coconut oil or shortening for that smooth coating consistency.
Can I make these cake balls gluten-free?
Yes, by using a gluten-free red velvet cake and ensuring all other ingredients are gluten-free, you can easily adapt this Red Velvet Cake Balls Recipe for gluten-sensitive diets without losing any deliciousness.
How long do cake balls last at room temperature?
It’s best to keep cake balls refrigerated, especially since they contain cream cheese frosting. At room temperature, they can safely stay out for a couple of hours but should be returned to the fridge to keep fresh and safe to eat.
Can I decorate cake balls with other toppings?
Definitely! Besides sprinkles and crumbs, try crushed candy canes for a festive touch, shredded coconut for texture, or even drizzles of contrasting chocolate for a stylish look that elevates your treats.
Final Thoughts
There is something truly joyful about making and sharing cake balls, especially when they’re as irresistibly delicious as in this Red Velvet Cake Balls Recipe. Their vibrant color, creamy texture, and sweet chocolate coating will make them a favorite that everyone will ask for again. I encourage you to give this recipe a go—you might just discover your new go-to dessert for celebrations and everyday indulgences alike!
Print
Red Velvet Cake Balls Recipe
- Prep Time: 20 minutes
- Cook Time: 0 minutes
- Total Time: 50 minutes
- Yield: 24 cake balls
- Category: Dessert
- Method: No-Cook
- Cuisine: American
Description
Delicious and easy-to-make Red Velvet Cake Balls featuring moist red velvet cake mixed with cream cheese frosting, dipped in smooth white chocolate and garnished with red velvet crumbs or sprinkles. Perfect bite-sized treats for parties or special occasions.
Ingredients
Cake Ball Mixture
- 3 cups crumbled red velvet cake
- 3/4 cup cream cheese frosting
Coating
- 2 cups white chocolate chips
- 1 teaspoon coconut oil or shortening (optional)
Garnish
- Red velvet crumbs or sprinkles (optional, for garnish)
Instructions
- Prepare the Cake Mixture: In a mixing bowl, combine the crumbled red velvet cake and cream cheese frosting. Mix thoroughly until the mixture has a dough-like consistency that holds together.
- Form the Cake Balls: Roll the mixture into 1-inch balls using your hands. Place each ball on a baking sheet lined with parchment paper to prevent sticking.
- Chill the Cake Balls: Refrigerate the cake balls for 30 minutes. This helps them firm up and maintain their shape during dipping.
- Melt the Chocolate Coating: In a microwave-safe bowl or double boiler, melt the white chocolate chips with the optional coconut oil or shortening. Stir until the mixture is smooth and glossy.
- Dip the Cake Balls: Using a fork or dipping tool, dip each chilled cake ball into the melted white chocolate, coating it completely. Let excess chocolate drip off.
- Garnish: Before the white chocolate coating sets, sprinkle red velvet crumbs or sprinkles on top for decoration and added texture.
- Set and Serve: Allow the cake balls to harden at room temperature or place them back in the refrigerator until the coating is firm. Serve chilled or at room temperature.
Notes
- Use a good-quality red velvet cake for best flavor and texture.
- Adding coconut oil to the white chocolate helps with smoother dipping and a shinier finish.
- Keep the cake balls chilled between dipping to prevent melting or losing shape.
- These cake balls can be stored in an airtight container in the refrigerator for up to 5 days.
- Allow cake balls to come to room temperature before serving for optimal flavor and texture.
