
If you have a sweet tooth but appreciate a cookie that’s as charming as it is delicious, then let me introduce you to the No-Spread Chocolate Sugar Cookie Cookies with Letter Embossing Recipe. These delightful treats combine rich chocolate flavor and a tender, melt-in-your-mouth texture that doesn’t spread while baking, making them perfect for beautifully embossed letters that add a personal, endless charm. Whether you want to spell out names, messages, or sweet nothings, these cookies turn every bite into a little masterpiece.
Ingredients You’ll Need
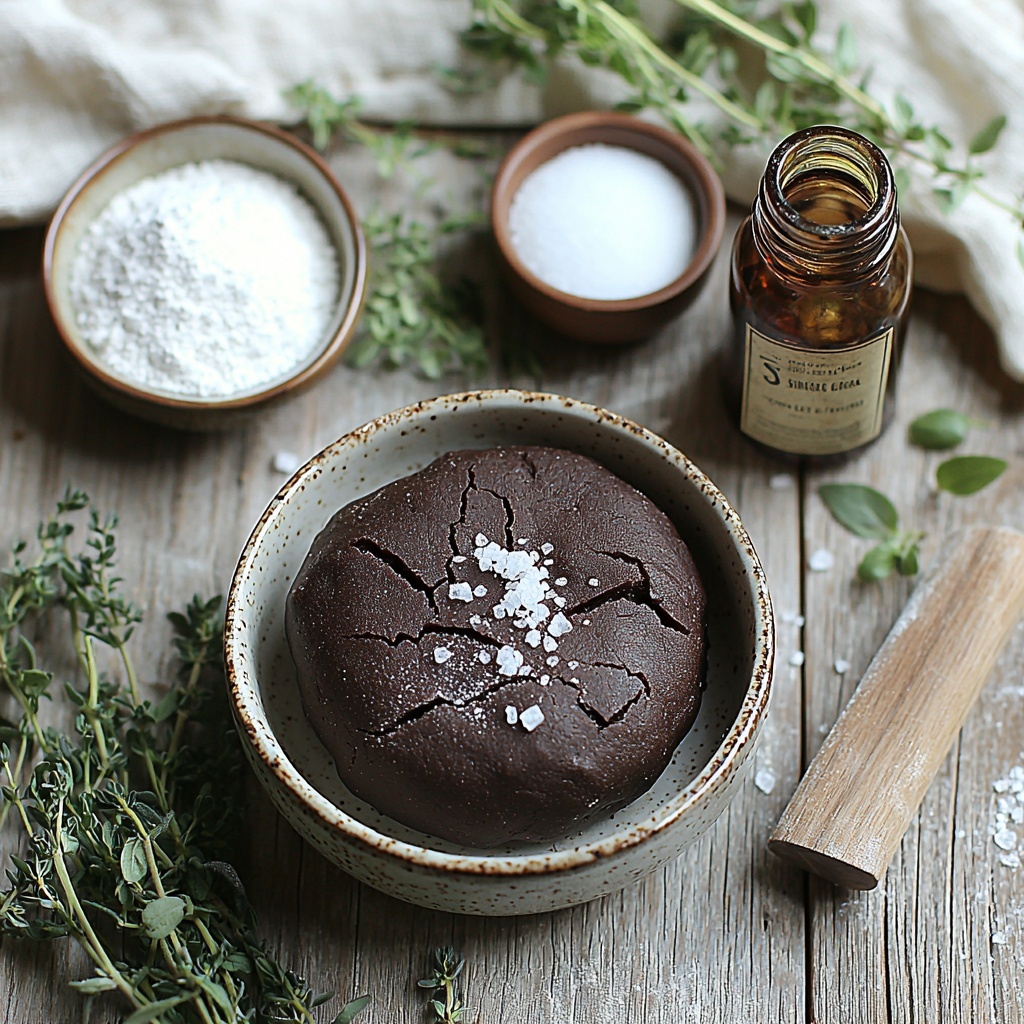
Getting the perfect balance of flavor and texture in these cookies relies on a few simple yet essential ingredients, each thoughtfully selected to elevate your baking experience.
- 1/2 recipe No-Spread Chocolate Sugar Cookie Dough: The foundation of the recipe, this dough keeps the cookies from spreading and ensures a rich chocolate base.
- 1 cup powdered sugar: Adds sweetness and a silky-smooth icing texture perfect for highlighting your embossed letters.
- 1/4 tsp cream of tartar: Helps stabilize the icing and gives it that light, fluffy finish.
- 1/8 tsp coarse Kosher salt: Balances sweetness and enhances the chocolate flavor beautifully.
- 1/2 tsp vanilla extract: Infuses the icing with a warm, inviting aroma and depth of flavor.
- 2 1/2 – 3 tbsp milk: Adjusts the icing consistency, allowing you to brush a perfect, smooth coat over the embossed cookies.
How to Make No-Spread Chocolate Sugar Cookie Cookies with Letter Embossing Recipe
Step 1: Prepare the Dough
Start by making half the batch of the No-Spread Chocolate Sugar Cookie Dough. This dough is special because it holds its shape perfectly without spreading out when baked, which is crucial for keeping those letter embossments crisp and clear.
Step 2: Ready Your Baking Surface
Line a large baking sheet with parchment paper. Having a non-stick surface ensures that your cookies bake evenly and are easy to remove without damaging the delicate embossed patterns.
Step 3: Roll Out the Dough
On a lightly floured work surface, roll the dough out evenly to just under 1/4 inch thick. Using a touch more flour as needed keeps the dough from sticking, but be gentle — you want to maintain the dough’s tender texture.
Step 4: Cut and Arrange the Cookies
Using 2-inch heart-shaped cookie cutters, cut out as many cookies as you can from the dough. Place them 1 to 2 inches apart on the prepared baking sheet to give them room before chilling. Don’t forget to gather and re-roll the scraps to maximize your dough.
Step 5: Emboss the Letters
This is where the magic happens. Organize your letter stamps, dip them lightly in flour or cocoa powder, tapping off any excess. Press the stamps gently into each cookie, just enough to leave an impression without cutting through the dough. This careful embossing lets you personalize each cookie with clear, readable letters that will shine after icing.
Step 6: Chill Before Baking
Pop the baking sheet into the refrigerator and let the cookies chill for one hour. This step ensures the cookies hold their shape and clean embossing during baking, giving you that no-spread perfection you’re after.
Step 7: Bake to Perfection
Preheat your oven to 350°F. Bake the chilled cookies on the center rack for about 12 minutes, keeping an eye on them to adjust for size variations. Removing them when just set helps keep them tender.
Step 8: Cool Cookies Before Icing
Allow the cookies to cool on the baking sheet for five minutes, then transfer gently to a wire rack to cool completely. Proper cooling means your icing won’t melt or blur the beautiful embossed letters.
Step 9: Whisk and Brush the Icing
While the cookies are still warm, whisk together powdered sugar, cream of tartar, salt, vanilla, and milk until smooth. Using a pastry brush, apply a thin layer of icing, making sure it fills the letter impressions beautifully. This thin glaze highlights every detail without overwhelming the cookie.
Step 10: Let Your Masterpieces Dry
Allow the cookies to dry completely before storing. This finishing step ensures your amazingly embossed letters will remain crisp and the icing perfectly set for your enjoyment.
How to Serve No-Spread Chocolate Sugar Sugar Cookie Cookies with Letter Embossing Recipe
Garnishes
Consider adding delicate edible glitter or a light dusting of cocoa powder to enhance the embossed letters. These simple garnishes add a little sparkle and dimension, making your cookies even more photo-worthy and special for occasions or gifts.
Side Dishes
Pair these rich chocolate sugar cookies with a scoop of vanilla or coffee ice cream for contrast or serve alongside a warm mug of creamy hot chocolate or spiced chai tea. The simple flavors complement the cookie without overpowering their unique embossing details.
Creative Ways to Present
Arrange the cookies on a pretty platter alongside handwritten notes or stack them with ribbons for personalized party favors. You can also create themed messages for celebrations, holidays, or heartfelt expressions, turning these cookies into delicious works of edible art.
Make Ahead and Storage
Storing Leftovers
Store leftover cookies in an airtight container at room temperature, keeping them crisp and fresh for up to five days. Make sure they are completely dry to prevent the icing from becoming sticky.
Freezing
If you want to keep the magic longer, freeze the baked and completely cooled cookies in a single layer inside a freezer-safe container. When ready to enjoy, thaw at room temperature to preserve the delicate embossing and icing.
Reheating
These cookies are best enjoyed at room temperature. If you prefer them slightly warm, microwave for just 5-7 seconds, but be careful not to melt the icing or soften the embossed details.
FAQs
Why do these cookies not spread during baking?
The dough is specially formulated with balanced fat and flour ratios to maintain its shape, which is essential for preserving the detailed embossed letters on the cookies.
Can I use different shapes besides hearts for cookie cutters?
Absolutely! While hearts are charming, any sturdy cookie cutter that fits your letter stamps works perfectly. Just keep the thickness consistent for the best embossing results.
How do I prevent the stirring letters from sticking to the dough?
Dipping your letter stamps lightly in flour or cocoa powder before pressing them into the dough prevents sticking while still leaving a clear impression.
Is it necessary to chill the cookies before baking?
Yes, chilling solidifies the dough and helps keep the embossing sharp and prevents spreading when baked, which is key to this recipe’s success.
Can I make these cookies gluten-free?
While this recipe uses traditional flour, you can experiment with gluten-free flour blends that behave similarly in no-spread doughs. Testing for texture and embossing clarity is recommended.
Final Thoughts
Making the No-Spread Chocolate Sugar Sugar Cookie Cookies with Letter Embossing Recipe is a wonderfully rewarding process that combines creativity and deliciousness. These cookies are perfect not only for eating but for gifting and celebrating special moments with a personalized touch. I cannot wait for you to try them and see how this charming recipe brings a little extra joy to your kitchen!
Print
No-Spread Chocolate Sugar Cookie Cookies with Letter Embossing Recipe
- Prep Time: 20 minutes
- Cook Time: 12 minutes
- Total Time: 1 hour 42 minutes
- Yield: 24 servings
- Category: Dessert
- Method: Baking
- Cuisine: American
- Diet: Vegetarian
Description
This delightful recipe for No-Spread Chocolate Sugar Cookie Dough creates thick, tender chocolate sugar cookies that hold their shape perfectly for stamping and decorating. With a richly chocolatey flavor and a smooth vanilla glaze that accents the embossed letters, these cookies are both beautiful and delicious, ideal for personalized messages or festive occasions.
Ingredients
Cookie Dough
- 1/2 recipe No-Spread Chocolate Sugar Cookie Dough
Icing
- 1 cup powdered sugar
- 1/4 tsp cream of tartar
- 1/8 tsp coarse Kosher salt
- 1/2 tsp vanilla extract
- 2 1/2 – 3 tbsp milk
Instructions
- Make the Dough: Prepare half the recipe of No-Spread Chocolate Sugar Cookie Dough following your standard recipe.
- Prepare Baking Sheet: Line a large baking sheet with parchment paper or baking paper to prevent sticking.
- Roll Out Dough: On a lightly floured surface, roll the dough evenly to just under 1/4 inch thick, adding additional flour as needed to prevent sticking.
- Cut Cookies: Use 2-inch heart-shaped cookie cutters to cut out cookies, placing them 1-2 inches apart on the prepared baking sheet. Re-roll scraps and continue cutting.
- Stamp Cookies: Organize letter stamps and dip them lightly in flour or cocoa powder, tapping off excess. Press gently into each cookie to leave a clear impression without piercing through.
- Chill Dough: Refrigerate the baking sheet with cookies for 1 hour to firm up the dough before baking.
- Bake Cookies: Preheat oven to 350°F (175°C). Bake cookies on the center rack for about 12 minutes, adjusting time if cookies are larger or smaller.
- Cool Cookies: Let cookies cool on the baking sheet for 5 minutes, then transfer carefully to a wire rack to cool completely.
- Prepare Icing: Whisk powdered sugar, cream of tartar, salt, vanilla extract, and milk together until smooth.
- Glaze Cookies: While cookies are still warm, brush a thin layer of icing over them, ensuring the embossed letters are well coated. Allow cookies to dry completely.
- Store: Once dry, store cookies in an airtight container.
Notes
- Use fine flour for dusting the stamps to avoid smudging the cookie surface.
- Chilling the dough before baking ensures the cookies maintain their shape and prevents spreading.
- If your cookie cutter or stamps are larger or smaller, adjust baking time accordingly.
- Make sure the glaze is thin enough to spread easily but thick enough to stay in the embossed letters.
- Store cookies in an airtight container to maintain freshness and prevent moisture absorption.


