“`html
If you’ve ever craved that perfect snack with the ultimate crunch and irresistible flavor, you’re in for a treat with the Homemade Tortilla Chips: 7 Crunchy Secrets You Need Now Recipe. With just a handful of simple ingredients and a handful of clever tips, you’ll transform ordinary corn tortillas into golden, crispy chips that put store-bought versions to shame. These chips are not only delightfully crunchy but also perfectly seasoned—ready to elevate your snacking or party platters in minutes!
Ingredients You’ll Need
Whipping up these homemade tortilla chips is refreshingly straightforward, relying on only a few essential ingredients that pack a punch in taste and texture. Each one plays a vital role, whether it’s bringing crispiness, a touch of oil richness, or that just-right hint of saltiness to every bite.
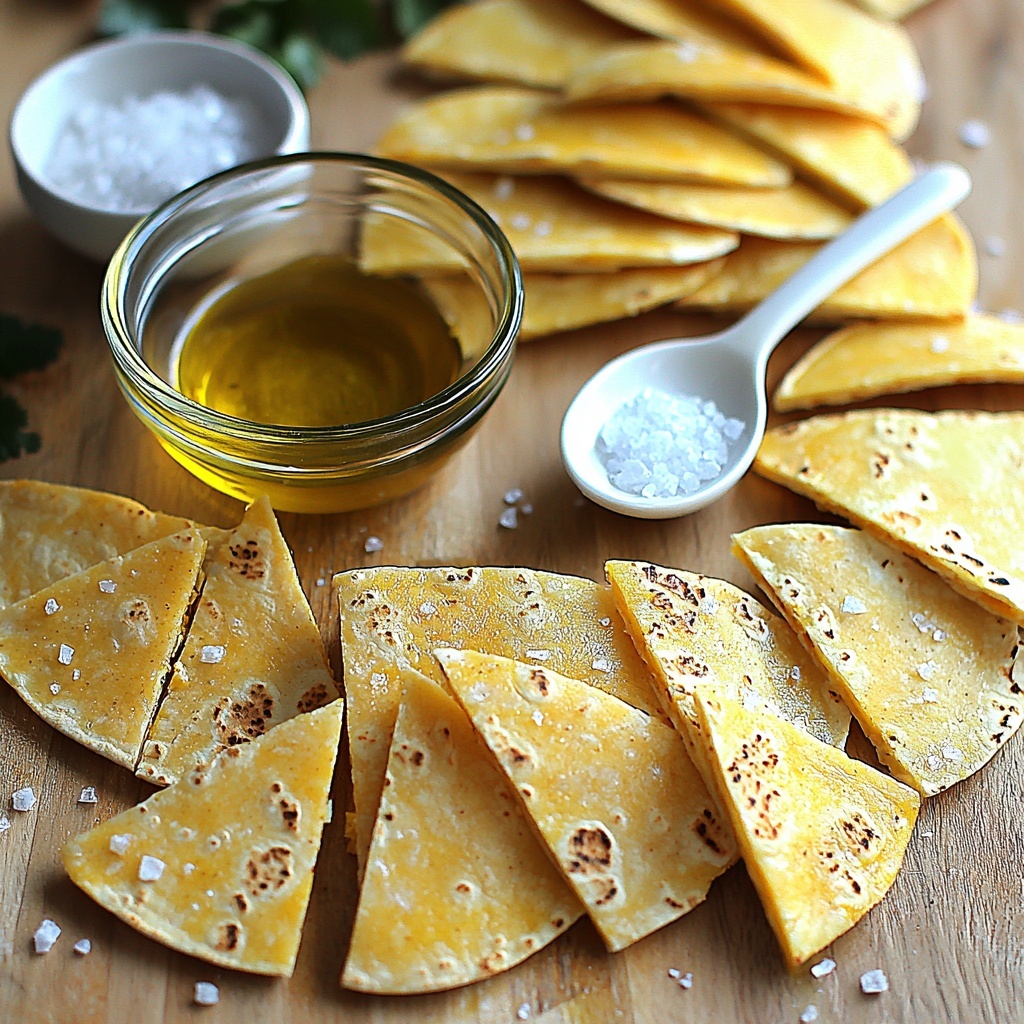
- 6 corn tortillas: The star base for authentic texture and flavor, providing that perfect canvas for crunchiness.
- 1/4 cup vegetable oil: Ensures a golden, crispy finish by evenly coating the tortilla wedges during baking.
- 1/2 teaspoon salt: A simple but essential seasoning that enhances and balances each chip’s flavor.
How to Make Homemade Tortilla Chips: 7 Crunchy Secrets You Need Now Recipe
Step 1: Preheat Your Oven to 350°F (175°C)
Starting with the right oven temperature helps the chips bake evenly without burning. Setting it to 350°F creates the perfect environment for those tortilla wedges to crisp up beautifully.
Step 2: Cut the Corn Tortillas Into Wedges
Slice each tortilla into 6 equal pieces, just like cutting a pizza. Uniform wedges ensure they cook evenly and each chip reaches that coveted crunch.
Step 3: Toss Tortilla Wedges with Vegetable Oil and Salt
In a large bowl, mix the wedges with the vegetable oil so each piece gets a light, even coating. Sprinkle the salt over the chips and give them a gentle toss to season all sides thoroughly.
Step 4: Lay the Wedges Out on a Baking Sheet in a Single Layer
Spread the tortilla wedges out without overlapping so hot air circulates freely, which prevents steaming and helps achieve a crisp, golden-brown finish.
Step 5: Bake for 10-15 Minutes, Turning Halfway
Pop the baking sheet in your preheated oven and bake the chips for 10 to 15 minutes. Make sure to flip the wedges halfway through to brown them evenly on all sides.
Step 6: Cool Before Serving
Once baked, let the chips cool for a few minutes on the baking sheet. This resting time lets the oil set and the chips firm up into that perfect crunchy texture.
How to Serve Homemade Tortilla Chips: 7 Crunchy Secrets You Need Now Recipe
Garnishes
Sprinkle fresh lime juice or a dash of chili powder over your chips right before serving to add a zesty or spicy kick. A light dusting of finely chopped cilantro can also brighten them up, making each chip taste vibrant and fresh.
Side Dishes
Pair your homemade chips with classic accompaniments like guacamole, salsa, or queso dip. They are sturdy enough to scoop up thick dips, making every bite an experience. For variety, try a black bean corn salad or a spicy pico de gallo as sides for a colorful and flavorful combo.
Creative Ways to Present
Serve your chips in a rustic basket lined with parchment paper or stack them in a tall glass for an enticing snack display. For parties, consider layering the chips in a trifle dish with layers of bean dip and cheese, turning them into a crowd-pleasing nacho platter.
Make Ahead and Storage
Storing Leftovers
Keep your homemade tortilla chips in an airtight container at room temperature to maintain their crispness. They stay delicious for 3 to 4 days, perfect for snacking the next day without losing that fresh-baked crunch.
Freezing
If you want to hold onto your chips longer, freeze them in a sealed plastic bag or container. When stored properly, they can stay fresh for up to a month. Just be sure to thaw at room temperature to avoid condensation, which can make them soggy.
Reheating
To revive any lost crunch after storage, pop the chips back in a 350°F oven for 3 to 5 minutes. This quick reheat breathes life back into them, making them taste freshly baked all over again.
FAQs
Can I use flour tortillas instead of corn tortillas?
While you can use flour tortillas, corn tortillas offer a more authentic crunch and flavor for these homemade chips. Flour tortillas tend to be softer and may not crisp up as well.
Is vegetable oil the best option, or can I use something else?
Vegetable oil works well because of its neutral taste and high smoke point, but you could also try canola or avocado oil for slight flavor variations and equally good results.
How do I prevent the chips from becoming soggy?
Make sure to spread the tortilla wedges in a single layer with space between them while baking. Also, allow the chips to cool completely on the baking sheet before storing to keep all that crunch intact.
Can I make these chips gluten-free?
Absolutely! Corn tortillas are naturally gluten-free, making this recipe a perfect crunchy snack option for those avoiding gluten.
What’s the secret to extra crunchiness in this recipe?
Even coating with oil, proper spacing on the baking sheet, baking at the right temperature, and flipping halfway through are the crucial secrets. Following these steps ensures your chips come out irresistibly crunchy every time.
Final Thoughts
Making your own tortilla chips at home is not only simple but incredibly rewarding, and the Homemade Tortilla Chips: 7 Crunchy Secrets You Need Now Recipe nails the balance of flavor and crunch perfectly. Give these tips a try, and I promise you’ll never look back to store-bought chips again. Happy snacking, my friend!
“`
Print
Homemade Tortilla Chips: 7 Crunchy Secrets You Need Now Recipe
- Prep Time: 10 minutes
- Cook Time: 15 minutes
- Total Time: 25 minutes
- Yield: 2 servings
- Category: Snack
- Method: Baking
- Cuisine: Mexican
Description
Discover how to make perfectly crispy and flavorful homemade tortilla chips with this easy recipe. Using simple ingredients like corn tortillas, vegetable oil, and salt, you can create a healthier and tastier alternative to store-bought chips. These chips are baked to golden perfection, making them great for snacking or serving with your favorite dips.
Ingredients
Ingredients
- 6 corn tortillas
- 1/4 cup vegetable oil
- 1/2 teaspoon salt
Instructions
- Preheat Oven: Preheat your oven to 350°F (175°C) to ensure it’s ready for baking the chips evenly.
- Cut Tortillas: Stack the corn tortillas and cut each into wedges, typically 6 or 8 cuts per tortilla, to create chip-sized pieces.
- Toss with Oil and Salt: In a large mixing bowl, gently toss the tortilla wedges with 1/4 cup vegetable oil and 1/2 teaspoon salt, coating each piece evenly for optimal crispness and flavor.
- Arrange on Baking Sheet: Spread the coated tortilla wedges in a single layer on a baking sheet, avoiding overlap to ensure they bake uniformly.
- Bake the Chips: Place the baking sheet in the oven and bake for 10-15 minutes, turning the chips halfway through the baking time to brown both sides evenly.
- Cool Before Serving: Remove the chips from the oven and let them cool completely on the baking sheet. This rest period helps them achieve maximum crunch before serving.
Notes
- For extra flavor, consider sprinkling some chili powder, cumin, or garlic powder along with the salt before baking.
- Keep an eye on the chips nearing the end of baking as they can quickly go from golden to burnt.
- Use fresh corn tortillas for the best texture and taste; stale tortillas may not crisp up well.
- Store any leftover chips in an airtight container to maintain crispness.


