
If you are dreaming of a cookie that captures the full festive spirit with every bite, look no further than this Delicious Christmas Kitchen Sink Cookies Recipe. Imagine a cookie packed with everything wonderful—gooey chocolate chips, crunchy nuts, sweet dried fruits, and even a salty crunch from pretzels—all combined in one perfect holiday treat. These cookies are not just packed with flavors and textures but also bring the warmth and joy of the season right into your kitchen. Whether for a family gathering, gifting, or simply enjoying with a cup of hot cocoa, this recipe will become your go-to for celebrating Christmas with a seriously delicious twist.
Ingredients You’ll Need
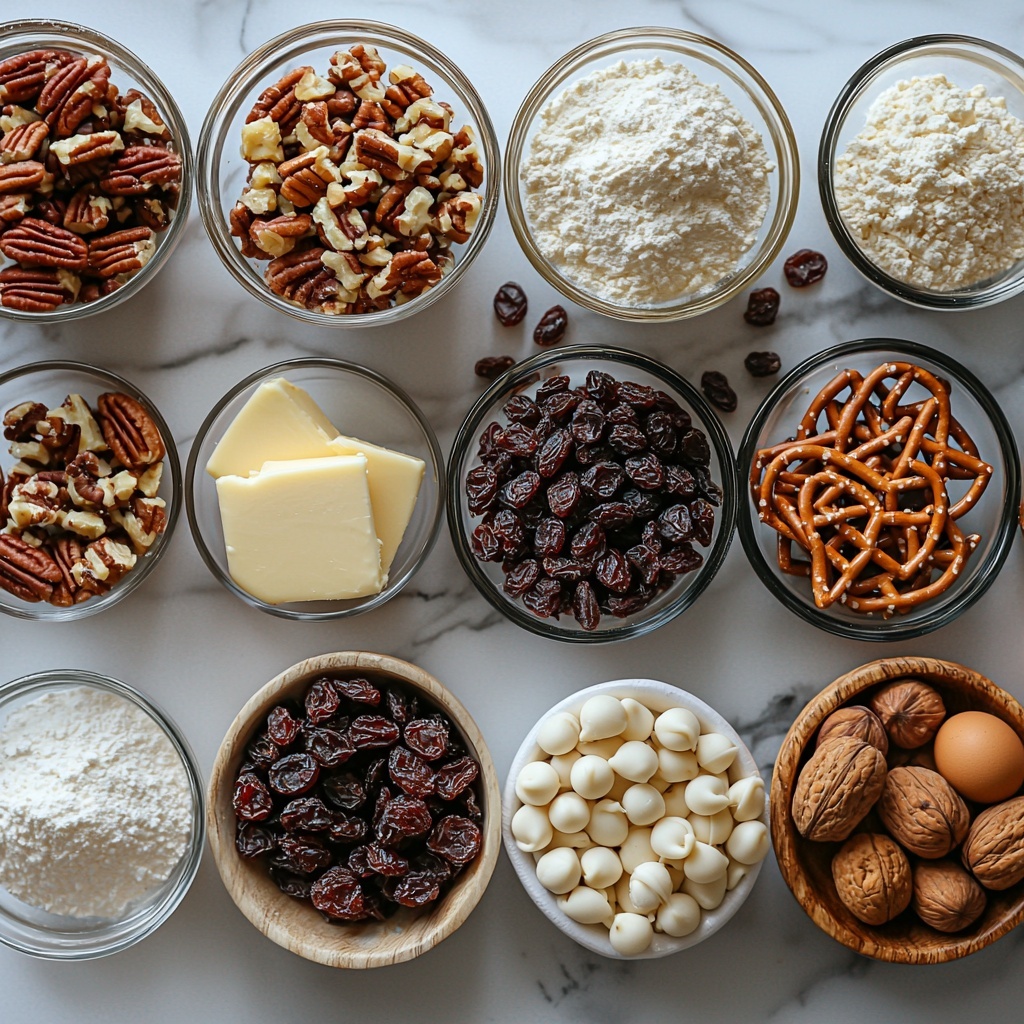
Getting the ingredients right is what makes this recipe truly shine. Each element plays a crucial role, whether it’s the creamy butter for richness, the blend of sugars for that perfect chewiness, or the mix-ins that add festive texture and color.
- 1 cup unsalted butter, softened: Provides a rich and creamy base that helps the cookies stay tender.
- 1 cup brown sugar: Adds moisture and a deep caramel flavor for chewy goodness.
- 1/2 cup granulated sugar: Balances the sweetness and creates the right cookie structure.
- 2 large eggs: Bind everything together while adding moisture and a slight lift.
- 1 teaspoon vanilla extract: Brings warmth and enhances all the other flavors gracefully.
- 2 1/2 cups all-purpose flour: The foundation that gives the cookies their perfect chewy and soft texture.
- 1 teaspoon baking soda: Helps the cookies rise just enough while maintaining a tender crumb.
- 1/2 teaspoon salt: Offsets the sweetness and highlights all the other flavors beautifully.
- 1 cup semi-sweet chocolate chips: Melts into pockets of rich chocolate yumminess throughout the cookie.
- 1 cup white chocolate chips: Adds a creamy contrast and festive appeal.
- Mix-ins (nuts, dried fruits, pretzels): Bring delightful crunch, chew, and bursts of seasonal sweetness and saltiness to every bite.
How to Make Delicious Christmas Kitchen Sink Cookies Recipe
Step 1: Prepare Your Oven and Baking Sheets
Start by preheating your oven to 350°F (175°C). Line two baking sheets with parchment paper—it not only helps the cookies bake evenly but makes cleanup a breeze. This small preparation step will set you up for success and a stress-free baking experience.
Step 2: Cream the Butter and Sugars
In a large bowl, beat the softened unsalted butter with the brown sugar and granulated sugar until light and fluffy, approximately 3-4 minutes. This process is key as it incorporates air, giving your cookies a tender and soft texture. Taking the time here really makes a noticeable difference.
Step 3: Add Eggs and Vanilla
Beat in the eggs one at a time, making sure each is fully combined before adding the next. Then stir in the vanilla extract. This step enhances the flavor and makes sure your dough is smooth and beautifully rich.
Step 4: Combine Dry Ingredients
In a separate bowl, whisk together the all-purpose flour, baking soda, and salt. Gradually add this dry mix into your wet ingredients every little bit at a time, mixing gently until just combined. Overworking the dough can toughen the cookies, so it’s best to combine until you no longer see flour.
Step 5: Fold in the Chocolate and Mix-ins
Here’s the fun part—fold in the semi-sweet chocolate chips, white chocolate chips, and your choice of mix-ins like crunchy nuts, chewy dried fruits, or salty pretzels. These ingredients turn simple cookies into a celebration of textures and flavors, truly living up to the name “kitchen sink.”
Step 6: Portion the Cookie Dough
Use a cookie scoop or a tablespoon to drop heaping spoonfuls of dough onto your prepared baking sheets. Be sure to leave space between each cookie, as they will spread while baking. This makes sure each cookie bakes evenly and holds its shape beautifully.
Step 7: Bake to Perfection
Bake the cookies in your preheated oven for 10-12 minutes. Watch for the edges to turn a golden brown while the centers still look slightly soft—that’s the sweet spot! This ensures your cookies will be perfectly chewy with just the right amount of crispiness on the edges.
Step 8: Cool and Enjoy
Once baked, let the cookies cool on the baking sheet for about 5 minutes. This resting time helps the cookies set and prevents breaking. Afterward, transfer them to a wire rack to cool completely, allowing all the flavors and textures to fully develop.
How to Serve Delicious Christmas Kitchen Sink Cookies Recipe
Garnishes
These cookies are gorgeous as they are, but if you want to make them even more festive, consider sprinkling a few colored sugar crystals or a light dusting of powdered sugar on top right after baking. Adding a few whole nuts or dried cranberries as a final touch can also brighten up the presentation and hint at the flavors inside.
Side Dishes
Serve these cookies alongside a mug of hot chocolate with whipped cream or a tall glass of cold milk for a classic treat. They also pair beautifully with spiced cider or even a holiday-themed coffee like peppermint mocha for adults looking to add a little extra cheer.
Creative Ways to Present
Stack these cookies in a rustic tin lined with holiday-themed tissue paper or arrange them on a decorative platter surrounded by pine sprigs and ornaments for a cheerful centerpiece. You can also wrap a few cookies in cellophane tied with ribbon to give as heartfelt homemade gifts that friends and family will adore.
Make Ahead and Storage
Storing Leftovers
To keep your Delicious Christmas Kitchen Sink Cookies fresh and chewy, store them in an airtight container at room temperature. They’ll stay perfect for up to a week, and the mix-ins help maintain a delightful texture without drying out.
Freezing
These cookies freeze wonderfully, making them ideal for prepping ahead of time. Place fully cooled cookies in a freezer-safe container or bag, separating layers with parchment paper. They can be frozen for up to three months without losing any flavor or texture.
Reheating
When you’re ready to enjoy leftovers, simply warm the cookies in a microwave for about 15-20 seconds or in a low-heat oven for 5 minutes. This brings back that just-baked softness and melty chip goodness, making every bite taste like fresh out of the oven.
FAQs
Can I use different types of nuts or dried fruits in these cookies?
Absolutely! One of the best things about the Delicious Christmas Kitchen Sink Cookies Recipe is its flexibility. Feel free to use pecans, walnuts, almonds, or even pistachios, and swap dried cranberries for raisins, cherries, or apricots to suit your taste and what you have on hand.
How do I prevent the cookies from spreading too much?
If your cookies are spreading too thin, try chilling the dough for 30 minutes before baking. Also, make sure your oven temperature is accurate, and avoid using too much butter, as that can cause excessive spreading.
Can I make these cookies gluten-free?
Yes! Substitute the all-purpose flour with a gluten-free flour blend designed for baking. Just ensure it includes xanthan gum or another binding agent to help keep the cookies’ structure intact.
Are these cookies crunchy or soft?
These cookies offer the best of both worlds with a soft and chewy center and just slightly crisp edges. They’re perfect for anyone who loves a cookie with layers of texture.
What’s the best way to mix the ingredients — by hand or electric mixer?
Either method works wonderfully. An electric mixer speeds up the creaming process for butter and sugar, but mixing by hand also delivers great results if you’re patient and want a more hands-on baking experience.
Final Thoughts
You really can’t go wrong with this Delicious Christmas Kitchen Sink Cookies Recipe when you want to make the holidays extra special. Each bite delivers cozy, festive flavors and delightful textures that bring everyone together. So grab your mixing bowl, invite a friend or family member to join, and bake up a batch of these festive favorites—you won’t regret it!
Print
Delicious Christmas Kitchen Sink Cookies Recipe
- Prep Time: 15 minutes
- Cook Time: 12 minutes
- Total Time: 27 minutes
- Yield: 24 cookies
- Category: Dessert, Cookies
- Method: Baking
- Cuisine: American
Description
These Delicious Christmas Kitchen Sink Cookies are a festive holiday treat packed with a delightful mix of chocolates, nuts, dried fruits, and pretzels. Soft in the center with golden edges, these cookies are perfect for sharing at holiday gatherings or gifting to loved ones.
Ingredients
Dough Ingredients
- 1 cup unsalted butter, softened
- 1 cup brown sugar
- 1/2 cup granulated sugar
- 2 large eggs
- 1 teaspoon vanilla extract
- 2 1/2 cups all-purpose flour
- 1 teaspoon baking soda
- 1/2 teaspoon salt
Mix-ins
- 1 cup semi-sweet chocolate chips
- 1 cup white chocolate chips
- Mix-ins: nuts (like pecans or walnuts), dried fruits (like cranberries or raisins), pretzels
Instructions
- Preheat and prepare baking sheets: Preheat your oven to 350°F (175°C). Line two baking sheets with parchment paper to ensure easy cleanup and prevent sticking.
- Cream butter and sugars: In a large mixing bowl, beat together 1 cup of softened unsalted butter, 1 cup of brown sugar, and 1/2 cup of granulated sugar until the mixture is light and fluffy, which should take about 3 to 4 minutes.
- Add eggs and vanilla: Beat in 2 large eggs one at a time, ensuring each egg is fully incorporated before adding the next. Stir in 1 teaspoon of vanilla extract to enhance flavor.
- Combine dry ingredients: In a separate bowl, whisk together 2 1/2 cups of all-purpose flour, 1 teaspoon baking soda, and 1/2 teaspoon salt. Gradually add this dry mixture to the wet ingredients, mixing gently until just combined to avoid overworking the dough.
- Incorporate mix-ins: Fold in 1 cup semi-sweet chocolate chips, 1 cup white chocolate chips, and your chosen mix-ins such as nuts, dried fruits, or pretzels until evenly distributed throughout the dough.
- Scoop dough onto baking sheets: Using a cookie scoop or tablespoon, drop heaping portions of dough onto the prepared baking sheets, spacing them sufficiently as the cookies will spread during baking.
- Bake the cookies: Place the baking sheets in the preheated oven and bake for 10 to 12 minutes, or until the edges are golden brown while the centers remain slightly soft. Monitor closely to prevent over-baking.
- Cool cookies: Once done, remove the cookies from the oven and allow them to cool on the baking sheets for 5 minutes. Then transfer the cookies to a wire rack to cool completely before serving or storing.
Notes
- You can customize the mix-ins based on your preference or for a festive touch, adding ingredients like crushed peppermint candies or toffee bits.
- For chewier cookies, slightly underbake by removing them when centers still look a bit soft.
- Ensure butter is softened to room temperature for easier mixing and better texture.
- Store cookies in an airtight container at room temperature for up to 5 days.
- Freezing cookie dough balls before baking can help control spread and enhance texture.


