
If you are craving a dish that blends bold flavors with a satisfying crunch, you are going to love this Crispy Chicken, Corn & Black Bean Tortilla Melts Recipe. It combines tender shredded chicken with sweet corn, zesty black beans, and melty Colby Jack cheese all layered on perfectly crisped corn tortillas. Every bite delivers a tempting mix of textures and bright tastes that feels both comforting and lively—a perfect meal to bring friends and family together. This recipe is straightforward but packed with vibrant ingredients that make it a standout anytime you want a delicious twist on a classic melt.
Ingredients You’ll Need
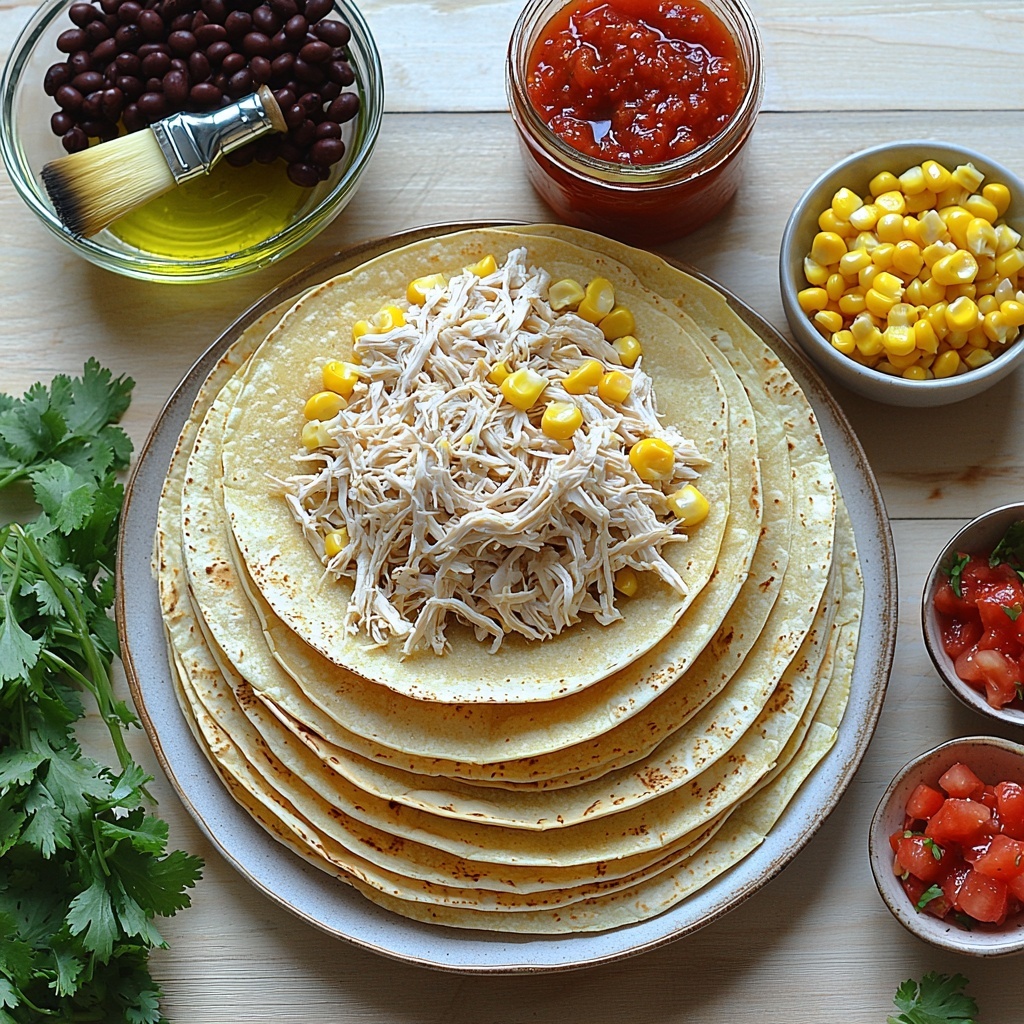
The magic of this recipe lies in its simple yet carefully chosen ingredients. Each component brings its own role—whether it’s the crunch from the corn tortillas or the savory warmth from the taco seasoning—making each bite a harmonious blend of flavors and textures.
- 8 corn tortillas (6-inch size): These provide the perfect crispy base to hold all the delicious toppings.
- 1 tbsp cooking oil: Essential for brushing the tortillas to achieve that irresistible crunch in the oven.
- 8.5 oz canned corn, drained: Adds a sweet pop of flavor and subtle juiciness.
- 1 1/2 cups cooked chicken, shredded: Tender protein that soaks up all the spices and salsa beautifully.
- 8 oz salsa (store-bought or homemade): Brings a tangy, spicy kick that livens up the filling.
- 2 tbsp taco seasoning mix: Infuses the filling with that classic southwestern flavor.
- 15 oz black beans, rinsed and drained: These contribute earthiness and hearty texture, making each bite more substantial.
- 2 cups shredded Colby Jack cheese: Melted cheese ties everything together with creamy, gooey goodness.
- Fresh cilantro leaves (for garnish): Adds a fresh, herbaceous note at the end.
- Diced tomatoes (for garnish): Bright and juicy, they add color and a refreshing finish.
How to Make Crispy Chicken, Corn & Black Bean Tortilla Melts Recipe
Step 1: Preheat and Prepare the Tortillas
Start by heating your oven to 450°F (230°C). Place the corn tortillas on a rimmed baking sheet and brush both sides lightly with cooking oil. This step is crucial for achieving that signature crispiness that makes these melts so addictive. Pop them in the oven to bake, flipping them halfway through, and keep a close watch to avoid burning—this usually takes about 10 minutes total.
Step 2: Cook the Flavor-Packed Filling
While your tortillas crisp in the oven, it’s time to create the filling. In a medium saucepan over medium heat, combine the drained corn, shredded chicken, salsa, taco seasoning, and black beans. Stir everything together and cook for around 5 minutes, just enough to warm through and let all the flavors mingle. This mixture is where the magic happens—each ingredient enhancing the others for a bold and satisfying taste.
Step 3: Assemble the Tostadas
Once the tortillas are beautifully crisp and the filling is heated, spoon about 1/2 cup of the chicken mixture evenly onto each tortilla. Then sprinkle 1/4 cup of shredded Colby Jack cheese over the top. The cheese will melt into a bubbly, golden layer that perfectly complements the savory filling.
Step 4: Final Bake and Melt
Return your assembled tortilla melts to the oven for an additional 5 minutes. This allows the cheese to melt thoroughly and become irresistibly gooey and slightly golden. Keep an eye on them to ensure they don’t overcook—just the right melt is what we’re aiming for.
Step 5: Garnish and Serve
When they come out of the oven, top each tortilla melt with fresh cilantro leaves and diced tomatoes to add brightness, freshness, and a splash of color. Serve immediately to enjoy that perfect combination of crispy tortillas, warm filling, and melted cheese.
How to Serve Crispy Chicken, Corn & Black Bean Tortilla Melts Recipe
Garnishes
Fresh garnishes really elevate this dish. Cilantro adds a herby crispness that cuts through the richness, while diced tomatoes bring a juicy, mildly sweet contrast. You might also consider a dollop of sour cream or a squeeze of lime to further brighten the flavors.
Side Dishes
Pair these melts with a simple side salad to keep things light, or serve alongside Mexican rice and guacamole for a more substantial feast. A bowl of fresh corn salsa also complements the dish beautifully, emphasizing the corn theme and adding an extra layer of texture.
Creative Ways to Present
For a crowd-pleasing presentation, arrange the tortilla melts on a large platter with colorful garnishes scattered all around. You can also cut them into smaller wedges to serve as appetizers at your next party. Layering them on individual plates with a fresh lime wedge makes for a fun and interactive eating experience.
Make Ahead and Storage
Storing Leftovers
If you happen to have any leftovers, store them in an airtight container in the refrigerator for 3-4 days. Keep the garnishes separate and add them fresh when reheating to maintain their crispness and flavor.
Freezing
This recipe does freeze well, although to preserve the best texture, freeze the assembled tortilla melts before baking. Wrap them tightly in plastic wrap and place in a freezer-safe container or bag for up to 2 months. When ready, thaw overnight in the fridge and then bake fresh for crispiness and melty perfection.
Reheating
To reheat, place your tortilla melts on a baking sheet and warm them in a preheated oven at 350°F (175°C) for about 10 minutes, or until heated through and the cheese is melty again. This will bring back their crisp texture far better than a microwave.
FAQs
Can I use flour tortillas instead of corn tortillas?
Absolutely! Flour tortillas will give a different texture and a softer base, but they work well. Just keep an eye on baking times as they may crisp up differently.
Is it possible to make this recipe vegetarian?
Definitely. Simply omit the chicken and add extra beans or grilled veggies to keep it hearty and flavorful.
Can I make the filling ahead of time?
Yes, you can prepare the filling a day in advance and store it in the fridge. When ready to assemble, just reheat the filling on the stove before spooning it onto the tortillas.
What type of salsa works best for this recipe?
Both store-bought and homemade salsa will do great here. Choose a medium-spiced salsa to balance the flavors without overpowering the dish.
How do I get the tortillas extra crispy?
Brushing both sides lightly with oil and baking at a high temperature while flipping halfway creates that perfect crispy base. Just remember to watch carefully as they can burn quickly.
Final Thoughts
This Crispy Chicken, Corn & Black Bean Tortilla Melts Recipe is one of those easy yet impressive dishes you’ll want to make again and again. The way the crunchy tortillas meet the spicy, cheesy filling is simply irresistible. Whether you’re cooking for a casual weeknight dinner or a fun gathering with friends, this recipe will bring warmth and big flavors to the table. Give it a try—you might just have a new favorite on your hands!
Print
Crispy Chicken, Corn & Black Bean Tortilla Melts Recipe
- Prep Time: 10 minutes
- Cook Time: 15 minutes
- Total Time: 25 minutes
- Yield: 4 servings
- Category: Main Course
- Method: Baking
- Cuisine: Mexican
Description
These Crispy Chicken, Corn & Black Bean Tortilla Melts are a flavorful and easy-to-make dish perfect for a quick weeknight dinner or casual gathering. Crunchy baked corn tortillas topped with a savory mixture of shredded chicken, corn, black beans, and salsa, finished with melted Colby Jack cheese and fresh garnishes. Ready in just 25 minutes, they offer a satisfying blend of textures and Mexican-inspired flavors.
Ingredients
For the Tortillas
- 8 corn tortillas (6-inch size)
- 1 tbsp cooking oil
For the Filling
- 8.5 oz canned corn, drained
- 1 1/2 cups cooked chicken, shredded
- 8 oz salsa (store-bought or homemade)
- 2 tbsp taco seasoning mix
- 15 oz black beans, rinsed and drained
For Topping
- 2 cups shredded Colby Jack cheese
- Fresh cilantro leaves (for garnish)
- Diced tomatoes (for garnish)
Instructions
- Preheat the oven: Set your oven to 450°F (230°C) to get it hot enough for crisping the tortillas evenly.
- Prepare and bake tortillas: Arrange the tortillas on a rimmed baking sheet. Brush both sides lightly with cooking oil to ensure they crisp nicely. Bake for 10 minutes, flipping the tortillas halfway through; keep a close eye and check every 2–3 minutes towards the end to prevent burning. Remove once they’re crisp and golden.
- Make the filling: While tortillas bake, heat a medium saucepan over medium heat. Add the canned corn, shredded chicken, salsa, taco seasoning, and black beans. Stir frequently and cook for about 5 minutes until the mixture is hot and flavors meld.
- Assemble the tostadas: Spoon about 1/2 cup of the chicken mixture evenly onto each baked tortilla. Sprinkle 1/4 cup of shredded Colby Jack cheese over the top of each.
- Melt the cheese: Return the assembled tortillas to the oven and bake for an additional 5 minutes, or until the cheese has melted and is bubbly.
- Garnish and serve: Remove the tortilla melts from the oven, then top with fresh cilantro leaves and diced tomatoes for added freshness and color. Serve immediately while warm and crispy.
Notes
- Watch tortillas carefully when baking to avoid burning, as oven temperatures and tortilla thickness vary.
- Use leftover cooked chicken or rotisserie chicken to save prep time.
- Adjust taco seasoning according to your spice preference.
- For a vegetarian version, omit chicken and increase black beans or add sautéed vegetables.
- Serve with sour cream or guacamole for extra creaminess if desired.


