
If you adore the festive charm of autumn but crave something sweet and playful, the Chocolate Covered Strawberry Pumpkins Recipe is your new go-to treat. These delightful bites transform simple strawberries into adorable, pumpkin-shaped desserts that capture the spirit of fall with every bite. Thanks to a smooth orange candy coating and a hint of green for the stems, this recipe not only tastes heavenly but also brings a whimsical touch to your dessert table. Whether you’re hosting a Halloween party or just want to enjoy a seasonal snack, this recipe is a total crowd-pleaser that’s surprisingly easy to make.
Ingredients You’ll Need
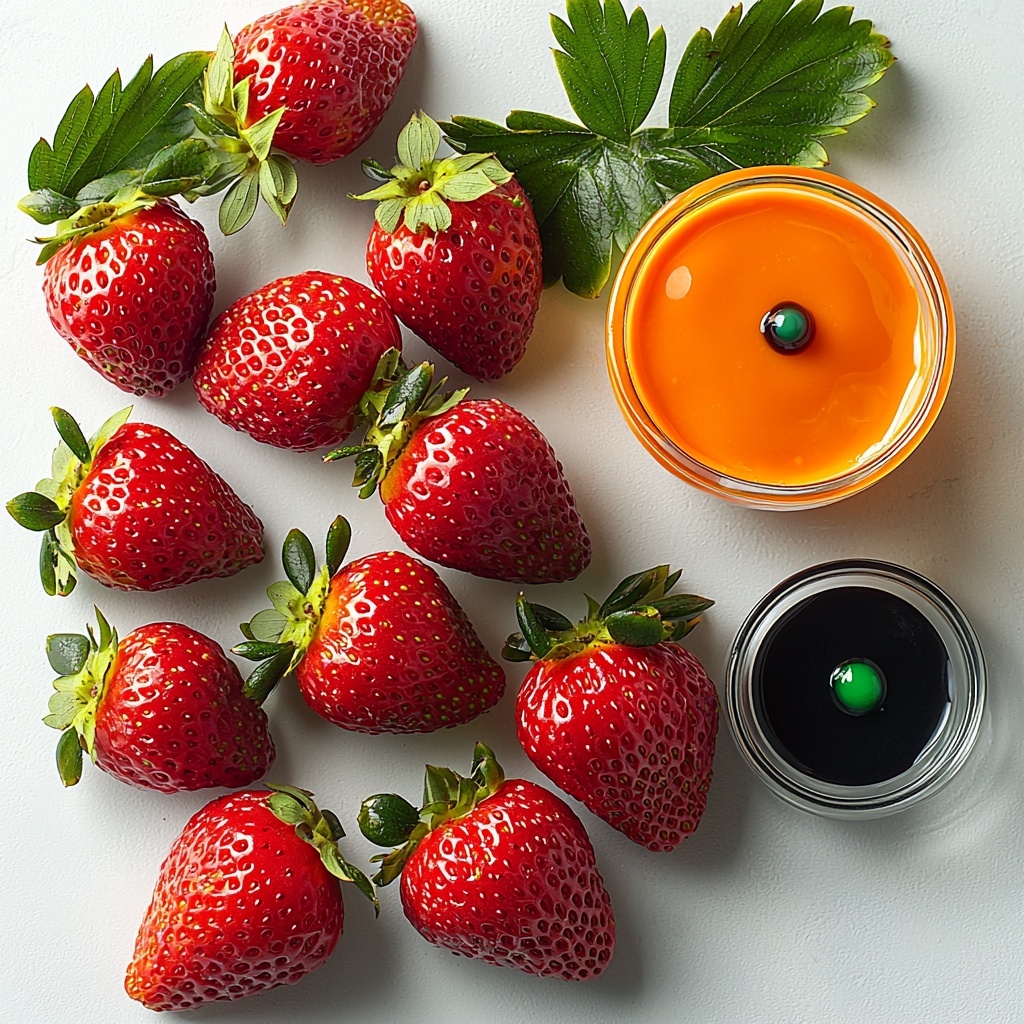
Gathering the right ingredients for the Chocolate Covered Strawberry Pumpkins Recipe is refreshingly simple, and each element plays a vital role. The strawberries bring juicy sweetness, the candy melts provide that smooth pumpkin hue with a delicious, sweet finish, and the green gel food coloring adds a perfect pop of color to mimic real pumpkin stems.
- 1 pint strawberries: Washed and dried thoroughly to ensure the candy coating sticks perfectly without sliding off.
- 2.5 cups orange candy melts: I recommend Wilton Candy Melts for their smooth finish and vibrant color, essential to give your treats that classic pumpkin look.
- 1-2 drops green gel food coloring (optional): Just a small amount creates the cute, natural-looking stems that complete the pumpkin illusion.
How to Make Chocolate Covered Strawberry Pumpkins Recipe
Step 1: Preparing the Strawberries
Start with the freshest strawberries you can find, and be sure to wash them gently. Then, dry each strawberry completely—any moisture left will cause the candy coating to slide right off, which is the last thing you want. Gently remove the leafy tops, or leave them intact if you prefer for easier handling later.
Step 2: Melting the Candy Coating
Place the orange candy melts in a microwave-safe bowl and heat in 30-second intervals, stirring thoroughly between each. This slow approach guarantees a smooth, lump-free finish that will coat your strawberries evenly. Once melted, add 1-2 drops of green gel food coloring to a small portion of the melted candy to use for the pumpkin “stems.”
Step 3: Dipping the Strawberries
Hold each strawberry by the stem or use a toothpick, then dip it into the orange candy melt, ensuring full coverage but avoiding a thick, heavy coat. Let the excess drip off before placing it on wax paper to set. This step is where the magic really happens, turning strawberries into charming little pumpkins.
Step 4: Adding the Pumpkin Stem Details
Using a small spoon or a toothpick, carefully dab a bit of the green candy melt onto the tops of the strawberries to create the pumpkin stems. This tiny detail adds so much character and makes these treats irresistibly cute. Allow the stems to set completely before moving to the next step.
Step 5: Creating Pumpkin Ridges
Once the orange coating begins to firm up but isn’t fully hard, use a clean toothpick or skewer to gently score vertical lines all around the strawberries. These lines mimic the natural ridges found on pumpkins, giving your treats an authentic, delightful look.
How to Serve Chocolate Covered Strawberry Pumpkins Recipe
Garnishes
To elevate your pumpkins, consider sprinkling a pinch of edible glitter or finely chopped nuts around the stem for extra texture and sparkle. These little touches make your treats look as impressive as they taste.
Side Dishes
Pair these chocolate covered strawberry pumpkins with a light whipped cream dip or a bowl of seasonal fruit salad for a balanced and refreshing experience. Their sweet, rich flavor complements more neutral or creamy accompaniments beautifully.
Creative Ways to Present
Arrange your pumpkin treats on a rustic wooden platter or in small mini pumpkin baskets for themed flair. You can also place them atop mini cupcake liners filled with crushed graham crackers to simulate soil, enhancing the autumnal feel in a playful and inviting way.
Make Ahead and Storage
Storing Leftovers
Keep any leftovers in an airtight container at room temperature, away from heat or direct sunlight, to preserve the candy’s glossy finish and keep the strawberries fresh for up to two days.
Freezing
If you want to save them for longer, freeze the chocolate covered strawberry pumpkins in a single layer on a baking sheet, then transfer them to an airtight container. Thaw them in the fridge for about an hour before serving to avoid sogginess.
Reheating
Since these treats are best enjoyed cold or at room temperature, reheating is not recommended as it can ruin the candy coating. If the candy melts lose their sheen, a quick chill in the fridge can help firm them back up.
FAQs
Can I use dark or milk chocolate instead of candy melts?
Absolutely! Dark or milk chocolate will give you a richer flavor, but it won’t have the vibrant orange color, which is key to making the strawberries look like pumpkins. You can try adding orange food coloring to white chocolate as an alternative.
What if I don’t have gel food coloring?
Gel food coloring is preferable because it’s more concentrated and won’t thin your candy melts, but if you don’t have it, a few drops of regular liquid food coloring might work, though it can affect the consistency of the coating.
How do I prevent the candy from cracking after it sets?
Make sure not to dip your strawberries when the candy is too hot and avoid dropping them from a height. Letting the candy cool and set gradually at room temperature helps keep the coating smooth and crack-free.
Can I make these pumpkin treats ahead of a party?
Yes! They hold up nicely for a day or two when stored properly. Just avoid making them too far in advance, as strawberries naturally release moisture over time which can affect the candy coating.
What size strawberries work best for this recipe?
Medium to large strawberries are ideal because they resemble mini pumpkins nicely and are easier to dip. Smaller berries may not give you that iconic pumpkin shape as clearly.
Final Thoughts
There is something truly joyful about bringing a little seasonal magic into your kitchen, and the Chocolate Covered Strawberry Pumpkins Recipe does just that in the sweetest way possible. It’s fun, festive, and guaranteed to impress your friends and family with both looks and flavor. I can’t wait for you to try it—these little pumpkin treats are bound to become one of your favorite fall traditions!
Print
Chocolate Covered Strawberry Pumpkins Recipe
- Prep Time: 15 minutes
- Cook Time: 10 minutes
- Total Time: 50 minutes
- Yield: 4 servings
- Category: Dessert
- Method: No-Cook
- Cuisine: American
- Diet: Vegetarian
Description
These Best Chocolate Covered Strawberry Pumpkins are a fun and festive treat perfect for fall celebrations. Juicy strawberries are dipped in vibrant orange candy melts to resemble mini pumpkins, with an optional green stem detail to complete the look. This easy no-bake recipe delivers a visually adorable and delicious snack that’s perfect for parties or gifting.
Ingredients
Fruits
- 1 pint strawberries (washed and dried thoroughly)
Coating
- 2.5 cups orange candy melts (such as Wilton Candy Melts)
- 1–2 drops green gel food coloring (optional, for pumpkin stems)
Instructions
- Prepare Strawberries: Thoroughly wash the strawberries and dry them completely using paper towels. Ensuring they are dry helps the candy coating to adhere properly without slipping off.
- Melt Candy Coating: In a microwave-safe bowl, melt the orange candy melts in 30-second increments, stirring in between, until smooth and fully melted. Be careful not to overheat to prevent burning.
- Dip Strawberries: Holding each strawberry by the stem, dip it into the melted orange candy coating, covering most of the berry to create a pumpkin shape. Allow excess coating to drip off before placing the strawberry on a parchment-lined tray.
- Create Pumpkin Stems (Optional): Add 1-2 drops of green gel food coloring to the remaining candy melts and stir to tint. Using a small knife or toothpick, draw small green stems on top of each coated strawberry while the candy is still tacky.
- Set and Chill: Place the coated strawberries in the refrigerator for about 15-20 minutes or until the candy coating is fully set and firm.
- Serve: Once set, carefully remove the strawberry pumpkins from the tray and serve immediately or store in an airtight container in the fridge for up to 2 days.
Notes
- Make sure strawberries are completely dry before dipping to ensure coating sticks well.
- You can substitute candy melts with colored white chocolate, but candy melts offer a smoother and more vibrant finish.
- Work quickly when adding green stems so the candy coating doesn’t harden before decorating.
- Store the strawberry pumpkins in the fridge to maintain freshness and prevent melting.
- For a different look, consider adding a little texture on the orange coating with a fork before it sets to mimic pumpkin ridges.


