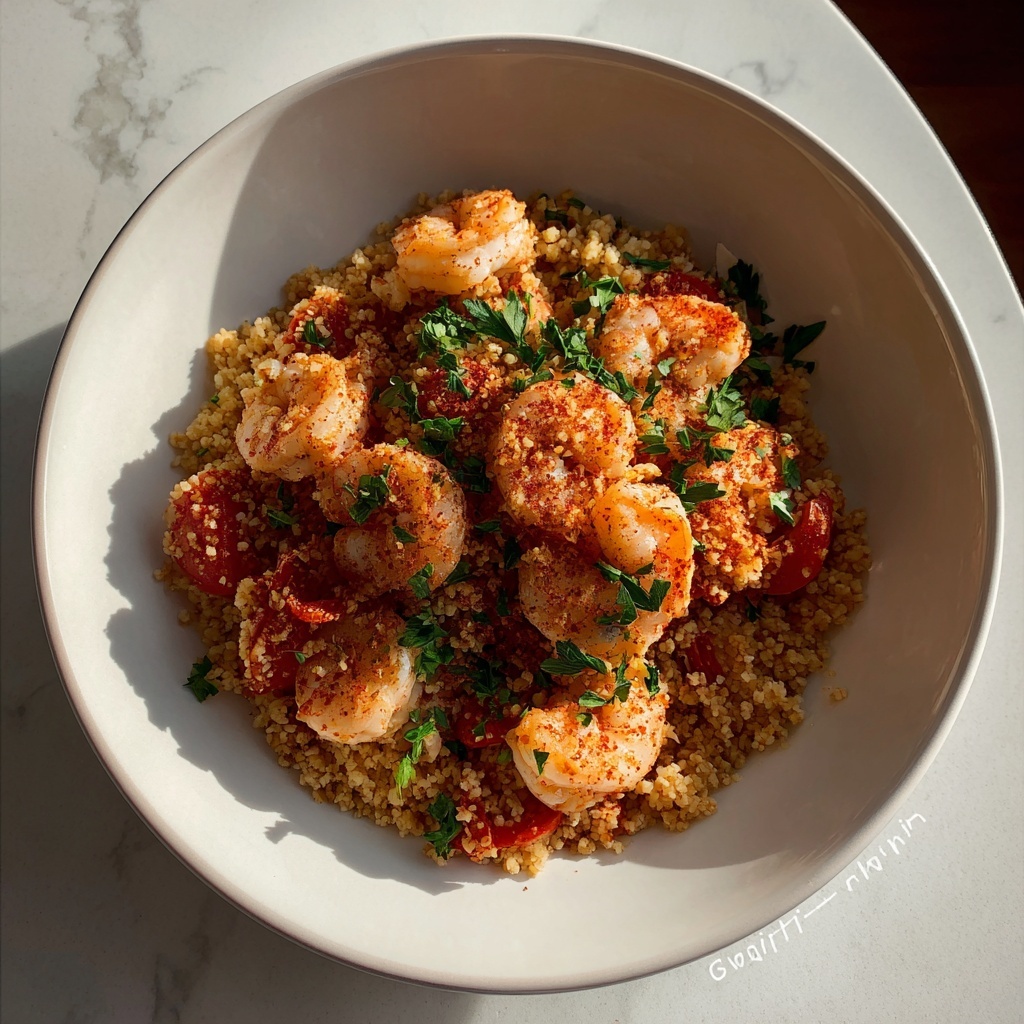
If you are craving a dish that perfectly balances flavors, textures, and colors, this Shrimp & Bulgur Pilaf Recipe is exactly what you need. It combines tender, juicy shrimp with nutty, fluffy bulgur, all infused with a rich tomato base and aromatic spices. This recipe is straightforward yet incredibly satisfying, making it ideal for a weeknight dinner or a special occasion where you want to impress without spending hours in the kitchen.
Ingredients You’ll Need
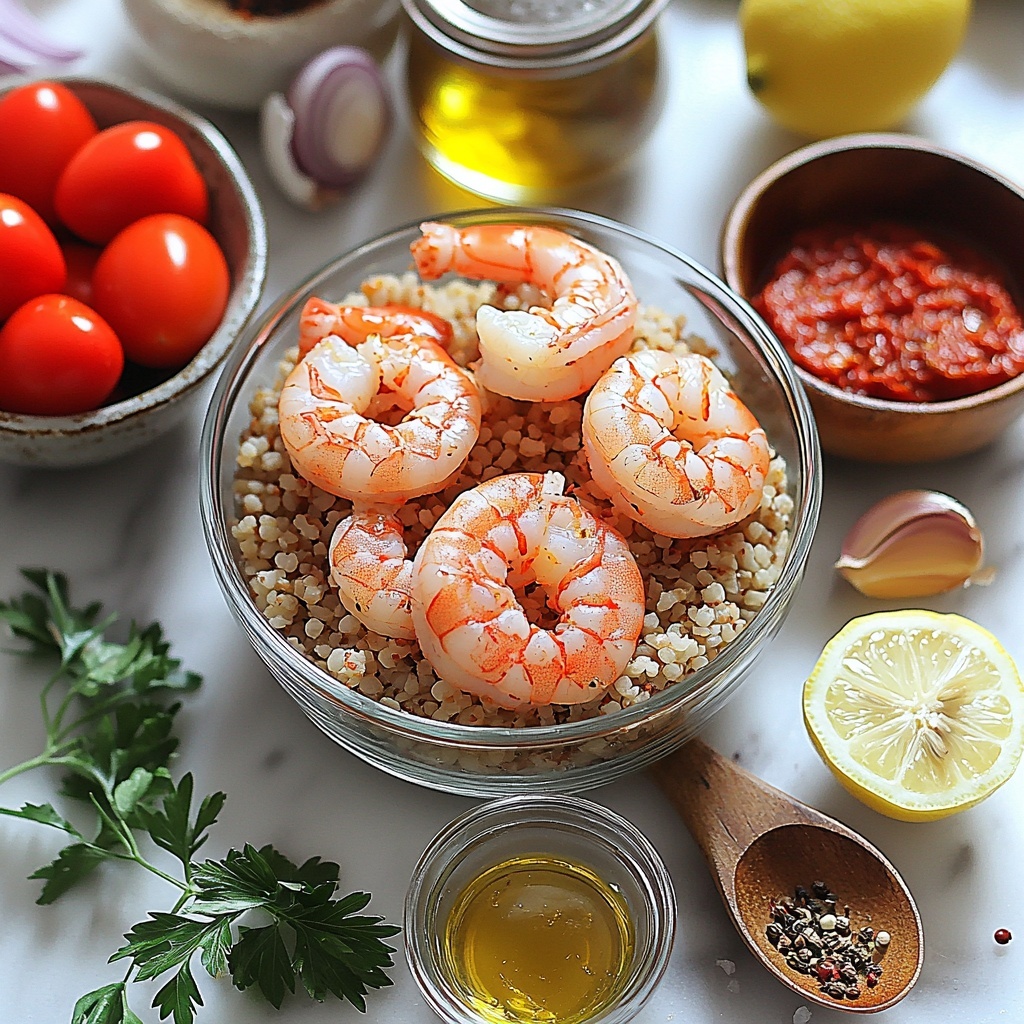
Each ingredient in this Shrimp & Bulgur Pilaf Recipe plays a vital role in creating a harmonious dish. The fresh shrimp brings a delightful seafood sweetness, while bulgur offers a wonderful chewy texture. Aromatic spices and fresh herbs tie everything together with depth and brightness.
- 1 pound shrimp, peeled and deveined: Provides the main protein and a succulent seafood flavor.
- 1 cup medium bulgur: Acts as the hearty grain base, absorbing all the delicious tomato and spice juices.
- 3 tablespoons olive oil: Adds richness and helps soften the onions and garlic.
- 1 medium onion, finely chopped: Gives a sweet, savory foundation when sautéed.
- 3 cloves garlic, minced: Infuses the dish with pungent aroma and flavor.
- 1 can (14.5 oz) diced tomatoes: Brings acidity and moisture, creating a comforting pilaf sauce.
- 1 tablespoon tomato paste: Concentrates the tomato flavor and deepens the color of the dish.
- 2 cups vegetable broth: Used to cook bulgur, adding extra flavor complexity.
- 1 teaspoon paprika: Adds warmth and a subtle smoky note.
- 1/2 teaspoon ground cumin: Introduces an earthy, slightly nutty undertone.
- 1 teaspoon salt: Enhances all the natural flavors harmoniously.
- 1/2 teaspoon black pepper: Provides gentle heat and spice contrast.
- 2 tablespoons fresh parsley, chopped: Offers fresh, grassy brightness at the end.
- Juice of 1/2 lemon: Adds a lively tang to balance the robustness of the pilaf.
How to Make Shrimp & Bulgur Pilaf Recipe
Step 1: Prepare Your Cooking Stations
Start by warming your skillet over medium heat and having your saucepan ready. This preparation ensures that you can cook the ingredients in swift succession without waiting around, which helps keep the shrimp tender and the bulgur perfectly cooked.
Step 2: Sauté the Aromatics
In your warmed skillet, add the olive oil and sauté the finely chopped onions until they become soft and translucent. This step brings out the natural sweetness of the onions. Next, add the minced garlic, tomato paste, paprika, and ground cumin. Cook everything together until fragrant; this step is essential because it wakes up the spices and deepens the flavor of the base.
Step 3: Cook the Bulgur
While the aromatics are cooking, bring your vegetable broth to a boil in a saucepan. Add the bulgur, then reduce the heat to low, cover, and simmer for 12 to 15 minutes. The bulgur will absorb the broth and become tender yet pleasantly chewy, laying the perfect foundation for the pilaf.
Step 4: Combine Tomatoes and Shrimp
Into the skillet with your aromatic base, stir in the diced tomatoes and let the mixture simmer gently for about 5 minutes. This softens the tomatoes and deepens the sauce. Then add the shrimp, cooking just until they turn pink and opaque, about three to four minutes. This quick cooking keeps the shrimp juicy and delicious.
Step 5: Bring It All Together
Fluff the cooked bulgur with a fork to separate the grains and then fold it into the skillet mixture. Give everything a good stir and let it simmer together for a few minutes so the flavors can meld beautifully. This is where the magic happens and your Shrimp & Bulgur Pilaf Recipe really starts to shine.
Step 6: Final Touches
Turn off the heat, squeeze the juice of half a lemon over the pilaf, and sprinkle with freshly chopped parsley. These additions bring a fresh brightness and a zesty finish that elevates the whole dish.
Step 7: Serve Warm
Scoop your pilaf into bowls and serve warm, optionally with lemon wedges on the side if you want that extra citrus kick. The combination of juicy shrimp, tender bulgur, and vibrant herbs is irresistible.
How to Serve Shrimp & Bulgur Pilaf Recipe
Garnishes
Fresh parsley is a must for this Shrimp & Bulgur Pilaf Recipe, as it adds a punch of green color and a fresh herbal note that brightens up each bite. Lemon wedges on the side are also a fantastic idea to invite your guests to add a squeeze of acidity that perfectly balances the pilaf’s richness.
Side Dishes
This pilaf pairs wonderfully with simple green salads, roasted vegetables, or a refreshing cucumber-yogurt sauce. These sides provide crispness and coolness, creating a balanced meal with contrasting textures and flavors.
Creative Ways to Present
For an eye-catching presentation, serve the Shrimp & Bulgur Pilaf Recipe in hollowed-out bell peppers or over a bed of grilled greens. You can also sprinkle crushed toasted nuts like pistachios or almonds on top for an unexpected crunch and a touch of elegance.
Make Ahead and Storage
Storing Leftovers
This pilaf keeps wonderfully in an airtight container in the refrigerator for up to three days. The flavors will continue to develop, making it just as delicious the next day.
Freezing
You can freeze leftovers, though shrimp textures can change slightly after freezing. It’s best to freeze the bulgur pilaf and shrimp separately if possible. Stored properly in freezer-safe containers, the bulgur pilaf can last up to two months.
Reheating
Reheat gently on the stovetop or in the microwave to maintain the shrimp’s tenderness and prevent the bulgur from drying out. If it seems a bit dry, add a splash of vegetable broth or water while reheating.
FAQs
Can I use other grains instead of bulgur?
Yes! Quinoa, couscous, or even rice can be substituted if you prefer, though the cooking times and liquid ratios may vary. Bulgur offers a unique chewy texture that complements shrimp beautifully.
Is there a way to make this recipe spicier?
Absolutely. Adding a pinch of red pepper flakes or some chopped fresh chili when sautéing the onions and garlic gives a nice, manageable heat that livens up the dish.
Can I prepare this recipe without seafood?
You can swap out shrimp for diced chicken, tofu, or chickpeas for a vegetarian version. Just adjust cooking times accordingly to ensure your protein of choice is cooked through.
How do I know when the bulgur is perfectly cooked?
Bulgur is done when it is tender but still has a firm bite, similar to al dente pasta. It should absorb most of the liquid but not become mushy.
What sides go best with Shrimp & Bulgur Pilaf Recipe?
Fresh salads, steamed greens, or a cool yogurt-based sauce complement this dish perfectly by balancing the warm spices and the savory tender shrimp.
Final Thoughts
This Shrimp & Bulgur Pilaf Recipe is one of those meals you’ll want to make again and again because it delivers comfort, elegance, and vibrant flavors all in one pot. It’s easy to prepare, uses simple ingredients, and the taste is absolutely unforgettable. Trust me, once you try this, it will have a special place on your regular dinner rotation.
Print
Shrimp & Bulgur Pilaf Recipe
- Prep Time: 10 minutes
- Cook Time: 25 minutes
- Total Time: 35 minutes
- Yield: 4 servings
- Category: Main Course
- Method: Stovetop
- Cuisine: Mediterranean
Description
This Shrimp & Bulgur Pilaf is a hearty and flavorful one-pan meal combining tender shrimp, nutty bulgur, and a savory tomato-based sauce seasoned with paprika and cumin. Quick to prepare in about 35 minutes, it’s perfect for a wholesome weeknight dinner with fresh parsley and a hint of lemon juice to brighten the flavors.
Ingredients
Main Ingredients
- 1 pound shrimp, peeled and deveined
- 1 cup medium bulgur
- 3 tablespoons olive oil
- 1 medium onion, finely chopped
- 3 cloves garlic, minced
- 1 can (14.5 oz) diced tomatoes
- 1 tablespoon tomato paste
- 2 cups vegetable broth
- 1 teaspoon paprika
- 1/2 teaspoon ground cumin
- 1 teaspoon salt
- 1/2 teaspoon black pepper
- 2 tablespoons fresh parsley, chopped
- Juice of 1/2 lemon
Instructions
- Prepare the skillet and saucepan: Warm your skillet over medium heat and have your saucepan ready to cook the bulgur.
- Sauté aromatics: In the skillet, add olive oil and sauté the finely chopped onions until they become soft and translucent. Add minced garlic, tomato paste, paprika, and ground cumin to the skillet. Cook for a few minutes until the mixture becomes fragrant, stirring occasionally to avoid burning.
- Cook the bulgur: In the saucepan, combine the bulgur and vegetable broth. Bring it to a boil, then reduce the heat to low, cover with a lid, and let it simmer for 12 to 15 minutes, or until the bulgur absorbs the liquid and becomes tender.
- Add tomatoes and shrimp: Stir the diced tomatoes into the skillet and allow the mixture to simmer for 5 minutes to meld the flavors. Next, add the peeled and deveined shrimp to the skillet and cook until the shrimp turn pink and opaque, which should take about 3 to 4 minutes.
- Combine bulgur and skillet mixture: Fluff the cooked bulgur with a fork to separate the grains. Gently fold the bulgur into the skillet with the shrimp and tomato sauce mixture. Let everything simmer together for a few more minutes to blend the flavors well.
- Finish and garnish: Turn off the heat. Add the juice of half a lemon and sprinkle the chopped fresh parsley over the pilaf. Stir gently to mix the flavors.
- Serve: Scoop the pilaf into bowls and serve warm. Optionally, offer additional lemon wedges on the side for extra brightness.
Notes
- Make sure the shrimp is cooked just until pink to avoid toughness.
- You can substitute vegetable broth with chicken broth for a richer flavor.
- For a spicier dish, add a pinch of cayenne pepper or chili flakes when sautéing the aromatics.
- Leftovers can be refrigerated for up to 2 days and reheated gently on the stovetop.
- To keep it gluten free, ensure to use certified gluten-free bulgur or substitute with quinoa.

