
If you’ve ever indulged in the irresistible snack that is Little Caesars Crazy Puffs, you know that bite-sized pocket of cheesy, saucy goodness is hard to forget. That’s why I’m beyond excited to share this Little Caesars Crazy Puffs Easy Copycat Recipe with you—a perfect way to enjoy those crispy, cheesy puffs straight from your own oven. They’re buttery, packed with melty cheese, tangy sauce, and pepperoni, all nestled inside soft, tender dough that browns to golden perfection. Whether you’re making these for game day, a quick snack, or family movie night, this recipe delivers the same crave-worthy taste with familiar, simple ingredients you probably already have on hand.
Ingredients You’ll Need
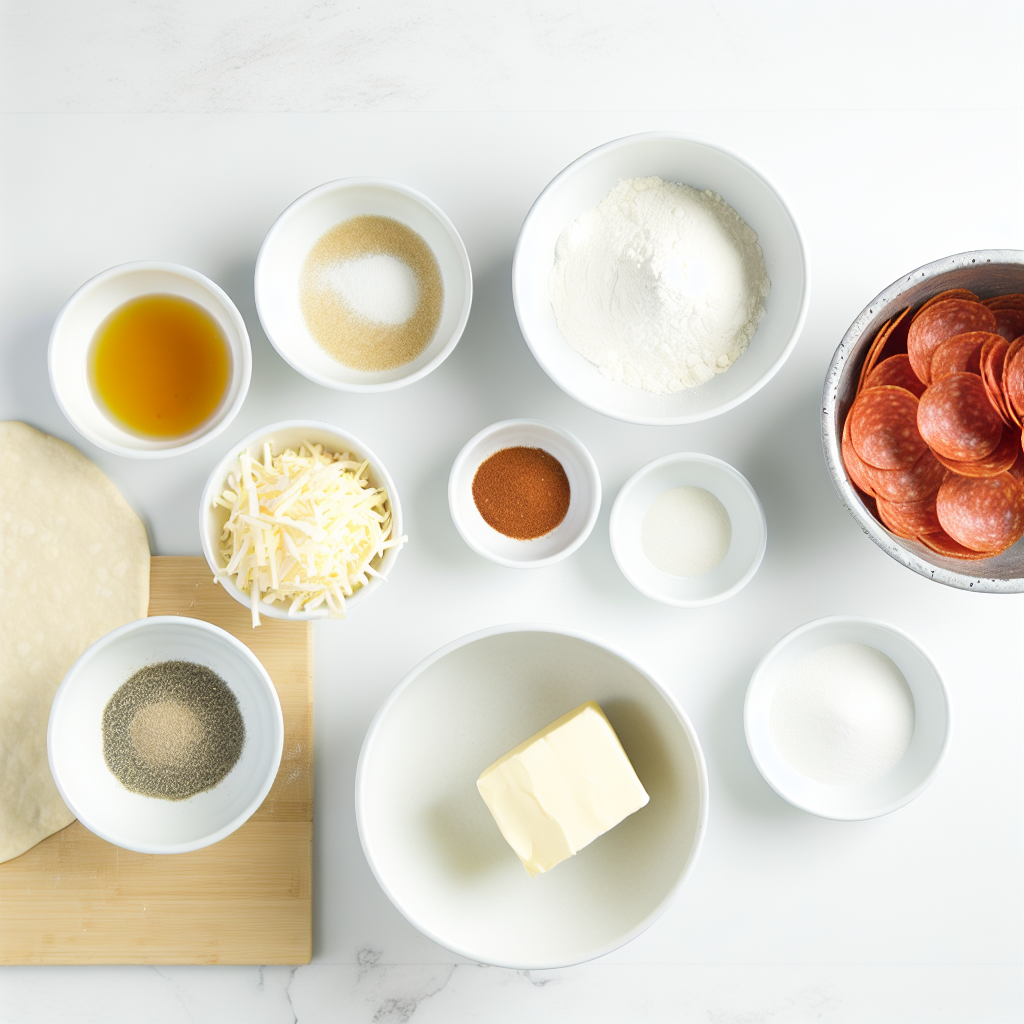
The magic of this Little Caesars Crazy Puffs Easy Copycat Recipe really lies in its straightforward ingredients, each carefully chosen to build layers of flavor and texture. From the rich butter that creates a golden crust to the perfect blend of cheeses that melt just right, these components come together effortlessly to make a snack that’s both easy and utterly delicious.
- 2 tablespoons butter: Adds buttery richness and helps create that nice crust in the muffin pan.
- 1 13.6-ounce can pizza dough (or 1 pound): The soft, fluffy base that holds all the fillings beautifully.
- 1/2 cup shredded low-moisture mozzarella cheese: Provides stretchy, gooey texture with classic pizza flavor.
- 1/2 cup shredded Muenster cheese: Adds a mild, creamy, slightly tangy depth to the cheese blend.
- 4 ounces pizza sauce: The zesty, savory heart of each puff that balances the richness.
- 4 ounces sliced pepperoni: Brings a little spicy, smoky bite—feel free to swap or add other meats!
- 1 teaspoon Italian seasoning: A perfect pinch of herbs to lift the whole flavor profile.
How to Make Little Caesars Crazy Puffs Easy Copycat Recipe
Step 1: Prepare the Oven and Muffin Pan
Start by preheating your oven to 425°F, which ensures a hot environment for the dough to rise and bake beautifully. While it heats, be generous with buttering each muffin cup—this prevents sticking and adds that golden crust Little Caesars Crazy Puffs are known for.
Step 2: Shape and Rise the Dough
Divide your pizza dough into 12 equal portions—rolling each into a smooth ball creates little dough “pockets” perfect for filling. Place one ball into each buttered muffin cup, then cover the pan with plastic wrap. Giving the dough a quick rise ensures those puffs get soft and tender before baking.
Step 3: Mix the Cheese Blend
While the dough rises, combine the low-moisture mozzarella and Muenster cheeses in a small bowl. This blend offers a flavorful melt that balances gooey stretch with creamy richness—essential for replicating the Crazy Puffs’ cheesy goodness.
Step 4: Create Dough Cavities with a Buttered Shot Glass
Butter a shot glass—this little trick prevents dough from sticking and helps shape the dough balls neatly. Press the buttered glass gently into the center of each risen dough ball. The dough will press against the muffin tin sides, forming a crater that’s ready to hold the fillings.
Step 5: Fill with Sauce, Pepperoni, Cheese, and Seasoning
Spoon about two small dollops of pizza sauce into each dough cup. Layer on a few pepperoni slices, then heap the cheese blend on top. A dash of Italian seasoning over everything ties the flavors together, giving it that authentic, herby kick that’s signature to the Crazy Puffs experience.
Step 6: Bake to Golden Perfection
Bake your assembled puffs for around 15 minutes, or until the dough is beautifully golden and the cheese is bubbling and slightly browned on top. The smell alone will be irresistible—trust me, this is the moment all the little details come together into magic.
How to Serve Little Caesars Crazy Puffs Easy Copycat Recipe
Garnishes
For a touch of freshness and flair, sprinkle your Crazy Puffs with extra Italian seasoning or a few fresh basil leaves right before serving. If you want a little zip, a tiny drizzle of hot honey or a sprinkle of crushed red pepper flakes can take these savory puffs to the next level.
Side Dishes
Pair these cheesy puffs with a crisp green salad or a tangy cucumber salad to cut through the richness. They also complement a bowl of soup beautifully, especially tomato basil or minestrone, turning a snack into a satisfying meal.
Creative Ways to Present
For parties or gatherings, arrange the Crazy Puffs on a rustic wooden board surrounded by small bowls of dipping sauces like ranch, extra pizza sauce, or garlic butter. You can also spear each puff with colorful toothpicks for easy grabbing and serving, making them a perfect finger food that’s as fun to eat as they are to make.
Make Ahead and Storage
Storing Leftovers
If you have leftovers, store them in an airtight container in the refrigerator for up to 2 days. To keep the crust from getting soggy, it’s best to let the puffs cool completely before storing—I like to place a paper towel underneath them to absorb any excess moisture.
Freezing
These puffs freeze wonderfully! After baking, let them cool completely, then wrap each puff tightly in plastic wrap and place them in a freezer bag. Frozen, they will stay fresh for up to 2 months, making them a fantastic make-ahead snack or quick appetizer to pull from the freezer anytime.
Reheating
To reheat, pop the frozen or refrigerated Crazy Puffs into a preheated oven at 350°F for about 8–10 minutes, or until warmed through and the crust is crisp again. Avoid the microwave if you want to keep that satisfying crunch and texture intact!
FAQs
Can I use homemade pizza dough for this recipe?
Absolutely! Homemade pizza dough works wonderfully and adds a personal touch. Just make sure your dough is soft and stretchy enough to shape into the cups without tearing.
Is there a vegetarian option for the pepperoni?
Definitely. You can swap out pepperoni for your favorite vegetarian toppings like sliced olives, mushrooms, or roasted red peppers for a veggie-friendly Crazy Puff that’s just as tasty.
What if I don’t have a shot glass to press the dough?
No worries! A small glass or even the back of a small measuring cup works well, just make sure it’s buttered so the dough doesn’t stick while shaping.
Can I make these gluten-free?
You can try using gluten-free pizza dough, though the texture might be slightly different. Be sure to follow baking instructions for your specific gluten-free dough so it rises nicely and doesn’t dry out.
How long do Crazy Puffs stay fresh after baking?
They’re best enjoyed fresh from the oven but will stay tasty for up to 2 days in the fridge when stored properly. Reheating in the oven helps bring back their crispy charm!
Final Thoughts
I can’t recommend enough giving this Little Caesars Crazy Puffs Easy Copycat Recipe a try—it’s a fun, delicious way to bring a beloved snack right into your kitchen. Whether you’re sharing with friends or sneaking a few extras for yourself, these cheesy, saucy bites are sure to become a fast favorite. So grab your ingredients, roll up your sleeves, and treat yourself to the joy of homemade Crazy Puffs that are just as addicting as the original!
Print
Little Caesars Crazy Puffs Easy Copycat Recipe
- Prep Time: 15 minutes
- Cook Time: 15 minutes
- Total Time: 30 minutes
- Yield: 12 servings
- Category: Appetizer
- Method: Baking
- Cuisine: American
Description
This Little Caesars Crazy Puffs Easy Copycat Recipe recreates the popular cheesy, pepperoni-stuffed bite-sized snacks that are crispy on the outside and gooey on the inside. Using pizza dough filled with pizza sauce, pepperoni, and a blend of mozzarella and Muenster cheeses, these savory puffs are a perfect party appetizer or snack, baked to golden perfection with a flavorful Italian seasoning finish.
Ingredients
Dough and Butter
- 2 tablespoons butter (plus extra for buttering the muffin pan and shot glass)
- 1 13.6-ounce can pizza dough (or 1 pound pizza dough)
Filling
- 1/2 cup shredded low-moisture mozzarella cheese
- 1/2 cup shredded Muenster cheese
- 4 ounces pizza sauce
- 4 ounces sliced pepperoni
- 1 teaspoon Italian seasoning
Instructions
- Preheat and Prepare Pan: Preheat your oven to 425°F. Generously butter the cups of a muffin pan to ensure the dough doesn’t stick during baking.
- Shape Dough Balls: Divide the pizza dough into 12 equal portions. Roll each portion into a smooth ball and place one dough ball into each buttered muffin cup. Cover the pan with plastic wrap and allow the dough to rise slightly until puffy.
- Mix Cheese Blend: In a small bowl, combine the shredded mozzarella and Muenster cheeses, mixing thoroughly for an even cheese blend.
- Create Dough Cavities: Butter a shot glass well, then press the buttered shot glass into the center of each risen dough ball. This action will push the dough up the sides of the muffin cup, forming a deep cavity for the filling.
- Add Filling: Fill each dough cavity with about 2 small spoonfuls of pizza sauce. Layer a few slices of pepperoni on top of the sauce, then generously sprinkle the cheese blend over the pepperoni. Finish each puff with a sprinkle of Italian seasoning for added flavor.
- Bake: Place the muffin pan in the preheated oven and bake the Crazy Puffs for approximately 15 minutes, or until the tops turn golden brown and the cheese is melted and bubbly.
Notes
- Butter the shot glass before pressing into the dough to prevent sticking and ensure clean cavity formation.
- For extra flavor, you can add garlic powder or red pepper flakes to the Italian seasoning mix.
- Allow the dough to rise sufficiently after portioning to create light, airy puffs.
- Serve warm for the best cheesy, gooey experience.
- These can be stored in an airtight container and reheated in the oven for a crispy finish.


