“`html
If you’ve ever wished for a gluten-free, delightfully soft, and flavorful tortilla, you’re going to absolutely love the Rice Tortillas: 5 Simple Steps to Deliciousness Recipe. These homemade rice tortillas bring an unexpected twist to your favorite wraps and tacos with a subtle nutty flavor and tender texture that’s perfect for those who crave something different yet utterly satisfying. Plus, making them from scratch is easier than you might think, turning your kitchen into a little tortilla factory where every bite feels like a warm hug.
Ingredients You’ll Need
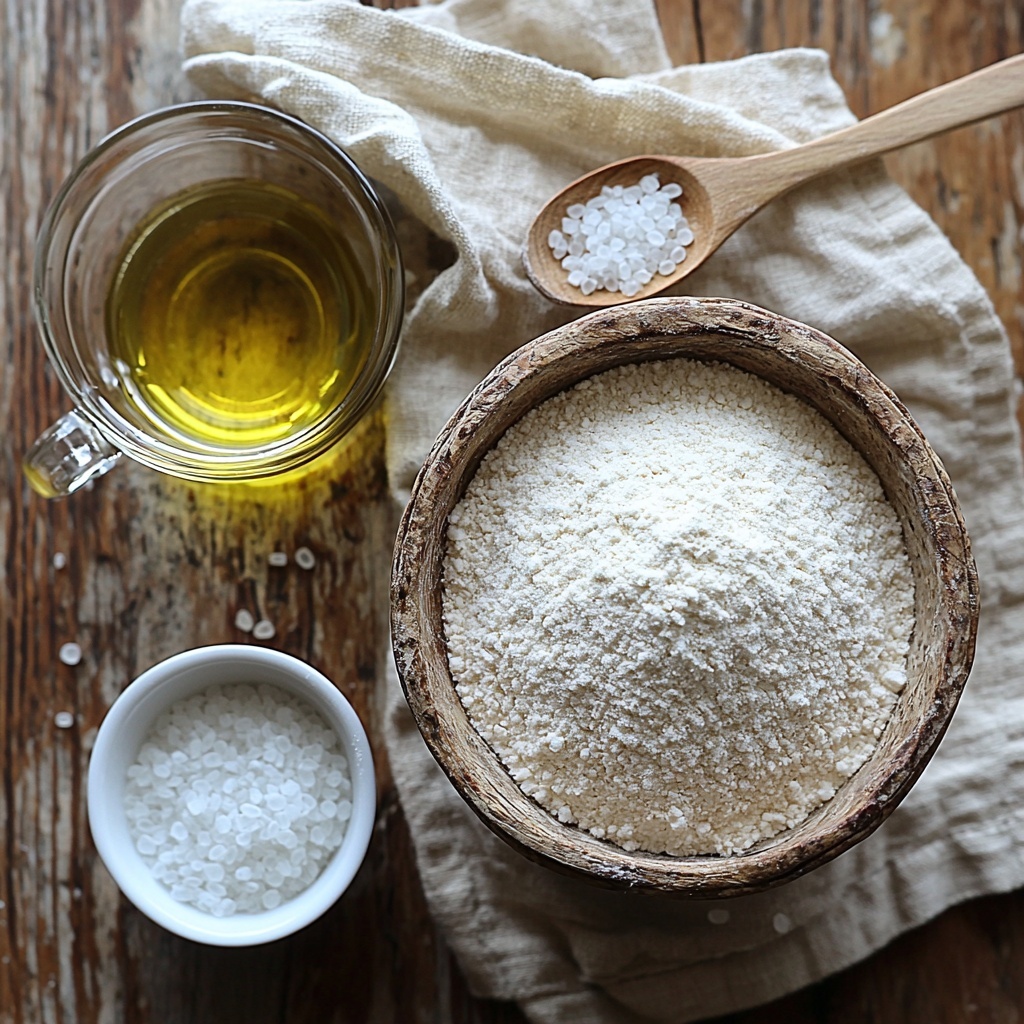
These simple ingredients come together to create a smooth, pliable dough that cooks into a perfectly tender tortilla. Each component plays a vital role: the rice flour provides the gluten-free base, the salt enhances flavor, warm water binds the dough just right, and olive oil adds a lovely richness and elasticity.
- 2 cups rice flour: This is the heart of your tortillas, offering a delicate flavor and great texture.
- 1/2 teaspoon salt: Just enough to balance and highlight the natural taste of the rice.
- 1 cup warm water: Warm water helps create a soft, workable dough.
- 1 tablespoon olive oil: Adds moisture and a subtle fruity richness while keeping the tortillas flexible.
How to Make Rice Tortillas: 5 Simple Steps to Deliciousness Recipe
Step 1: Mix the Dry Ingredients
Start by combining the rice flour and salt in a large bowl. This ensures the salt is evenly distributed and sets the foundation for the dough’s seasoning. Mixing the dry ingredients first helps you avoid clumps and guarantees every tortilla has perfect flavor consistency.
Step 2: Add Warm Water and Olive Oil
Gradually pour in the warm water along with the olive oil. The warmth softens the rice flour, making it easier to form dough, while the olive oil enriches the mixture and adds a touch of smoothness. Stir until the ingredients start coming together.
Step 3: Knead Until Smooth
Now it’s time to get hands-on! Knead the dough gently but thoroughly on a clean surface until it becomes smooth and pliable. You want a dough that’s not too sticky but soft enough to roll out easily. This step is crucial for that perfect texture.
Step 4: Divide the Dough into Small Balls
Divide your dough into about 10 equal portions, rolling each into a neat ball. Smaller balls make for manageable, evenly sized tortillas, ensuring consistent cooking and a nice round shape when flattened.
Step 5: Flatten and Cook Each Tortilla
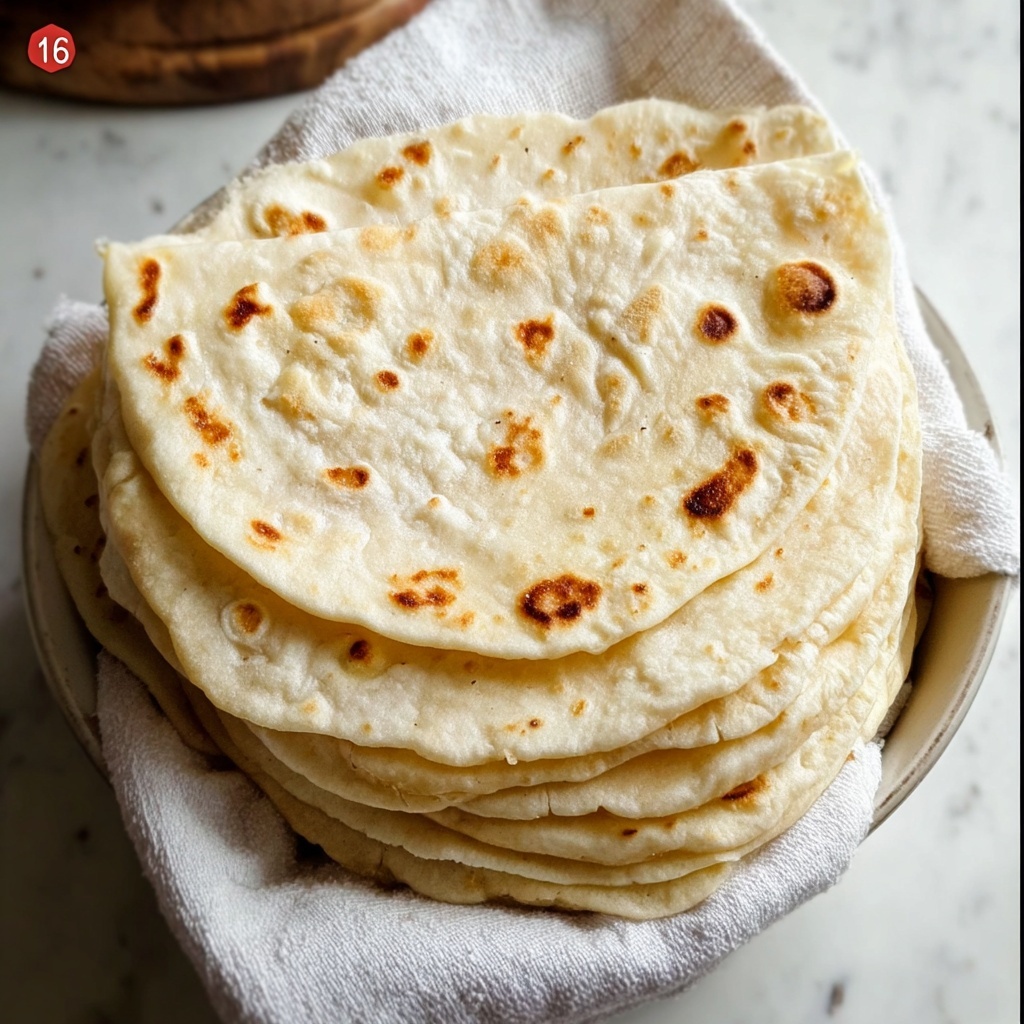
Flatten each dough ball into a thin circle using your hands or a rolling pin, aiming for uniform thickness. Then cook each tortilla on a hot skillet for 1 to 2 minutes on each side, until you see light golden spots and a slightly puffed surface. These little golden moments are what make the rice tortillas so irresistible.
How to Serve Rice Tortillas: 5 Simple Steps to Deliciousness Recipe
Garnishes
Topping your rice tortillas with fresh cilantro, a splash of lime juice, or a sprinkle of chili powder can elevate their flavor to new heights. The neutral base of the tortilla means it beautifully complements any garnish, making each bite vibrant and fresh.
Side Dishes
Serve these rice tortillas alongside roasted vegetables, grilled meats, or a vibrant bean salad for a complete meal. Their mild taste pairs wonderfully with both spicy and savory sides, giving you endless ways to enjoy them.
Creative Ways to Present
Try filling them with your favorite fillings like shredded chicken, avocado, or a zesty slaw for delicious wraps. You can also cut them into chips, lightly crisping them in the oven for homemade tortilla chips — perfect for dipping and sharing at any gathering.
Make Ahead and Storage
Storing Leftovers
If you have extras, store your rice tortillas in an airtight container or wrapped tightly in plastic wrap. They will stay fresh and ready to enjoy for 3 to 4 days when refrigerated, making them perfect for quick meals throughout the week.
Freezing
You can freeze rice tortillas by placing parchment paper between each one and then sealing them in a freezer-safe bag. This keeps them from sticking together and preserves their softness. They will maintain their quality for up to 2 months in the freezer.
Reheating
To enjoy your rice tortillas after storing or freezing, simply warm them on a hot skillet for about 30 seconds on each side. This revives their tender texture and brings back that freshly made flavor we all love.
FAQs
Can I use regular flour instead of rice flour?
While you can substitute regular wheat flour, it will change the texture and gluten content of the tortillas. The Rice Tortillas: 5 Simple Steps to Deliciousness Recipe specifically shines with rice flour for gluten-free and tender results.
How thin should I roll out the tortillas?
Aiming for about 1/8 inch thickness is ideal. This thickness ensures the tortillas cook evenly and remain flexible without breaking or becoming too crispy.
Can I add flavors or herbs to the dough?
Absolutely! Feel free to mix in finely chopped herbs, spices, or even a bit of garlic powder to personalize your tortillas. Just be mindful not to add too much liquid when experimenting.
Why use warm water to make the dough?
Warm water helps hydrate the rice flour better, leading to a soft, easier-to-knead dough. Cold water can make the dough tougher and less pliable.
What’s the best way to prevent tortillas from sticking during cooking?
Make sure your skillet is hot enough before placing the tortilla down, and lightly grease it if necessary. Cooking at the right temperature allows the tortilla to form a nice surface quickly, preventing sticking.
Final Thoughts
I hope you feel inspired to try the Rice Tortillas: 5 Simple Steps to Deliciousness Recipe in your own kitchen. These tortillas are a fantastic way to enjoy a classic favorite with a gluten-free twist and minimal fuss. Imagine the joy of homemade wraps filled with your favorite fresh ingredients—a true delight that’s both satisfying and wholesome. Give it a go, and I’m sure this recipe will become one of your treasured staples!
“`
Print
Rice Tortillas: 5 Simple Steps to Deliciousness Recipe
- Prep Time: 10 minutes
- Cook Time: 15 minutes
- Total Time: 25 minutes
- Yield: 10 tortillas
- Category: Bread
- Method: Stovetop
- Cuisine: Mexican
- Diet: Gluten Free
Description
Discover the simplicity of making soft and delicious rice tortillas at home with just a few basic ingredients. These gluten-free tortillas are perfect for wraps, tacos, or as a side for your favorite dishes, offering a wonderful alternative to traditional wheat tortillas.
Ingredients
Dry Ingredients
- 2 cups rice flour
- 1/2 teaspoon salt
Wet Ingredients
- 1 cup warm water
- 1 tablespoon olive oil
Instructions
- Mix dry ingredients: In a bowl, combine the rice flour and salt thoroughly to ensure even seasoning.
- Add liquids: Pour in the warm water and olive oil slowly into the flour mixture.
- Knead the dough: Using your hands, knead the mixture until it forms a smooth and pliable dough, adding a little more water if necessary.
- Divide dough: Break the dough into small equal-sized balls to prepare for shaping.
- Shape tortillas: Flatten each dough ball into thin, round tortillas using your hands or a rolling pin.
- Cook tortillas: Heat a skillet over medium-high heat and cook each tortilla for 1-2 minutes per side until they develop light golden spots and are cooked through.
Notes
- Use warm water to help the dough bind better.
- If the dough is too sticky, add a little more rice flour.
- Cook tortillas on a dry skillet; no oil is necessary to avoid frying.
- Serve immediately or keep warm wrapped in a clean towel to preserve softness.
- Rice tortillas are naturally gluten-free, making them a great option for those with gluten sensitivities.


