“`html
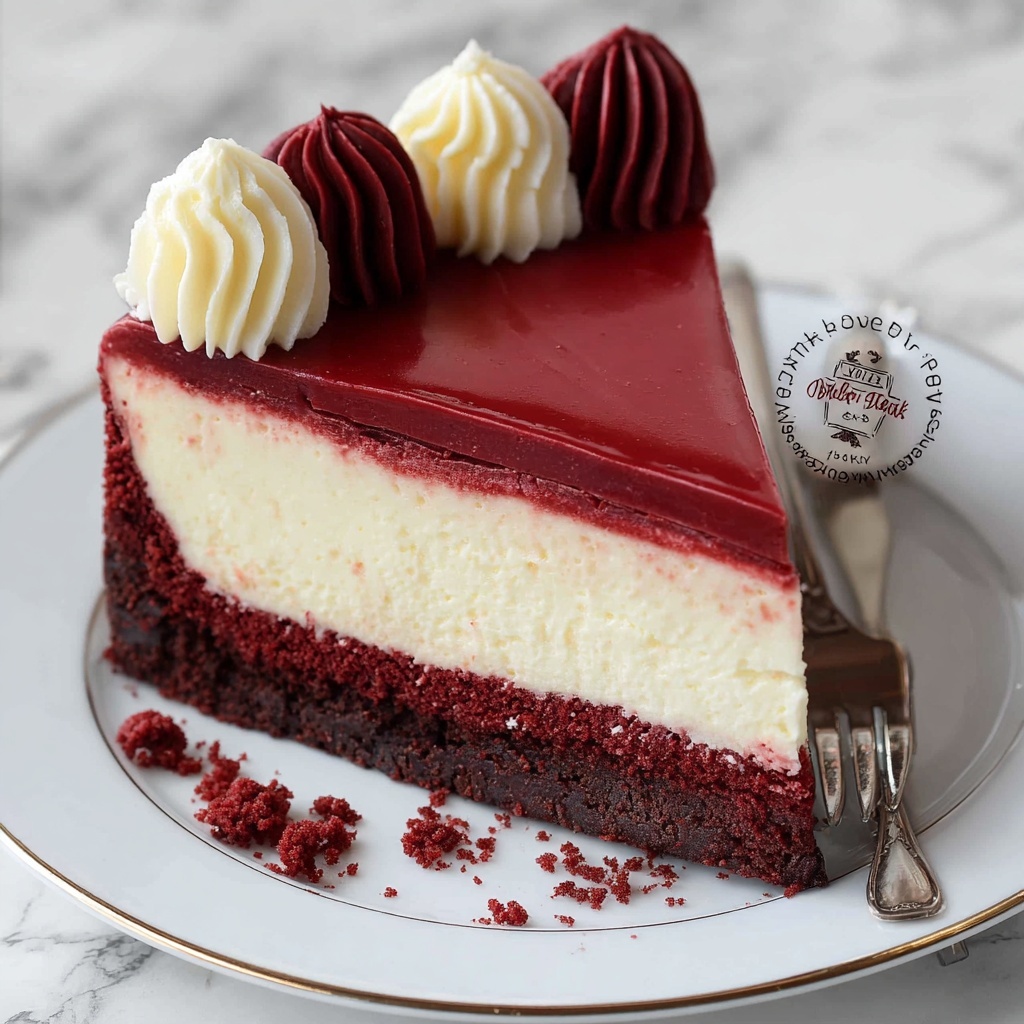
If you are on the hunt for a dessert that effortlessly combines rich creaminess with a vibrant twist of classic charm, this Homemade Red Velvet Cheesecake Recipe is calling your name. Picture a luscious cream cheese filling tinged with cocoa and vivid red hues, nestled on a buttery Oreo crust that adds just the right amount of crunch. It’s that show-stopping treat perfect for celebrations or cozy nights in, and once you try it, you’ll wonder how you ever lived without this decadent delight in your baking repertoire.
Ingredients You’ll Need
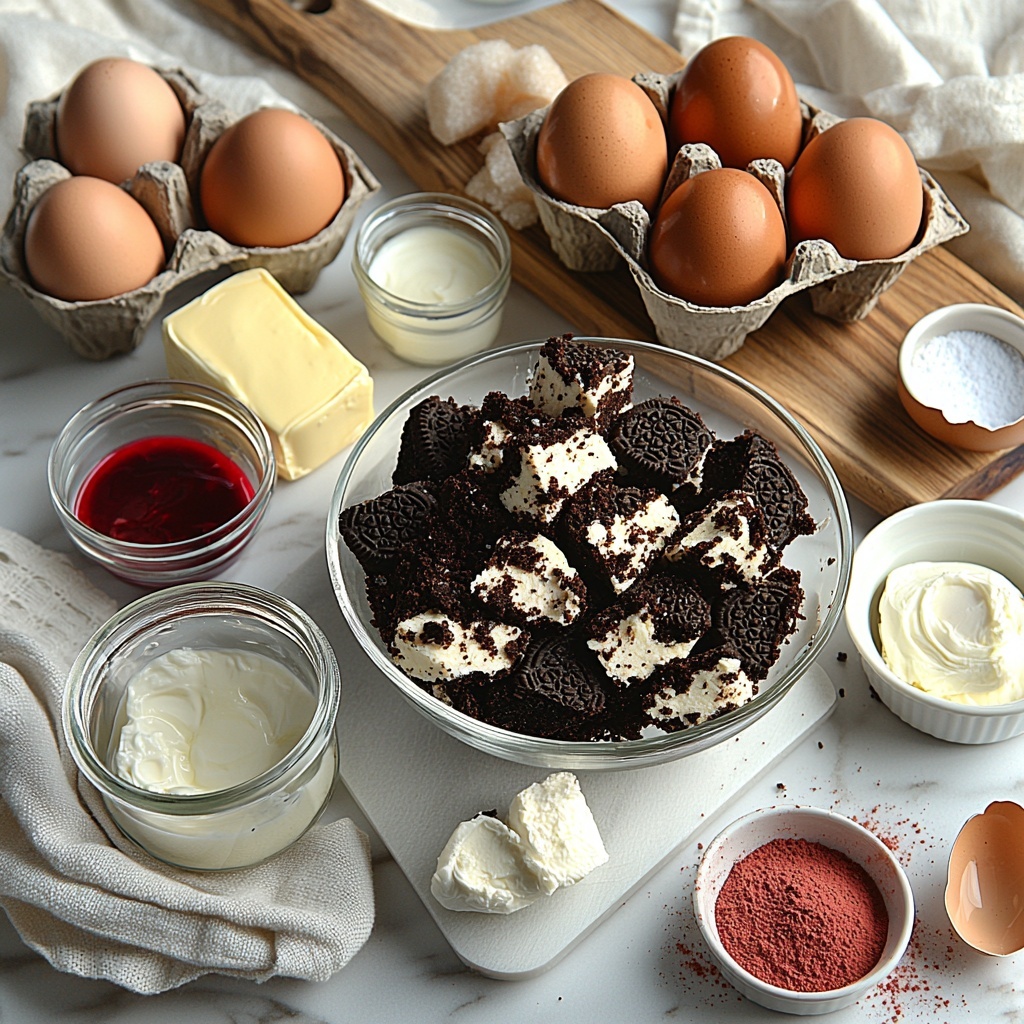
The magic behind this Homemade Red Velvet Cheesecake Recipe lies in a handful of simple but high-impact ingredients, each contributing uniquely to the luscious texture, rich flavor, and stunning color. From the chocolaty depth of cocoa powder to the tangy smoothness of sour cream, every component plays its part perfectly.
- 2 ½ cups (250 g) crushed Oreo cookies: Using Oreos for the crust adds an irresistible chocolatiness and crunch that’s hard to beat.
- 5 tablespoons unsalted butter, melted: Binds the crust together while imparting a rich, buttery flavor.
- 32 ounces (908 g) cream cheese, softened: The creamy heart of the cheesecake, providing a silky smooth base.
- 1 ⅓ cups (267 g) granulated sugar: Balances the tanginess of cream cheese with just the right sweetness.
- ½ cup (42 g) cocoa powder: Infuses the filling with a subtle, deep chocolate flavor that complements the red velvet profile.
- 1 cup (227 g) sour cream, room temperature: Adds moisture and a slight tang for a luscious mouthfeel.
- 1 tablespoon white vinegar: Enhances the cake’s tenderness and reacts beautifully with the baking environment.
- 1 tablespoon vanilla extract: Brings warmth and rounds out the cheesecake’s flavor.
- 1-2 ounces red food coloring: Gives the iconic bright red hue that makes this dessert a showstopper.
- 4 large eggs, room temperature, lightly beaten: Bind the filling and add structure without compromising creaminess.
- 4 ounces (113 g) cream cheese, softened: For the frosting, delivering that classic creamy finish.
- ¼ cup (56 g) unsalted butter, softened: Creates a silky texture in the frosting and balances sweetness.
- 2 cups (260 g) confectioners’ sugar: Sweetens the frosting perfectly with a smooth texture.
- 1 teaspoon vanilla extract: Adds fragrant depth to the frosting.
How to Make Homemade Red Velvet Cheesecake Recipe
Step 1: Prepare the Crust
Start by preheating your oven to 350°F (175°C) and wrapping the bottom of a 9-inch springform pan in two layers of heavy-duty aluminum foil to prevent leaks. Combine the crushed Oreo cookies with the melted butter until the crumbs are evenly coated, then firmly press this mixture along the bottom and sides of the pan. Bake the crust for about 10 minutes, just enough to set it firmly — then let it cool. This base is what brings a delightful crunch to every bite while complementing the creamy cheesecake.
Step 2: Mix the Cheesecake Batter
Lower the oven temperature to 300°F (150°C). In a large bowl, beat the softened cream cheese until silky smooth, eliminating lumps for that ideal velvet texture. Gently add the granulated sugar and cocoa powder, blending until the mixture is well combined and creamy. Stir in the sour cream, white vinegar, vanilla extract, and the red food coloring—this is where your cheesecake starts glowing with that signature red velvet vibe. Finally, carefully fold in the lightly beaten eggs, taking care not to overmix so the batter stays light and airy.
Step 3: Bake with a Water Bath
Pour the luscious batter over your cooled Oreo crust in the springform pan. Place the pan inside a larger roasting pan and pour boiling water into the roasting pan so it reaches halfway up the sides. This water bath is key to baking your cheesecake gently, avoiding cracks and creating an ultra-smooth texture. Bake for 1 hour, then turn off the oven but leave the cheesecake inside in the water bath for an additional hour. This slow cooling helps lock in moisture and enhances creaminess.
Step 4: Cool and Chill
Transfer your cheesecake to a wire rack and let it cool completely at room temperature. Then pop it into the refrigerator for at least 4 hours—overnight is best—to allow it to set fully and develop those decadent flavors. Patience here pays off immensely for that perfect slice.
Step 5: Make the Frosting and Finish
To create the luscious frosting, beat together the softened cream cheese and butter until creamy and smooth. Gradually add the confectioners’ sugar and vanilla extract, mixing until the frosting is light, sweet, and spreadable. Generously frost the chilled cheesecake just before serving to add a rich, creamy finish that complements the tangy and chocolaty filling beautifully.
How to Serve Homemade Red Velvet Cheesecake Recipe
Garnishes
A simple dusting of cocoa powder or a few fresh raspberries can make your Homemade Red Velvet Cheesecake Recipe even more irresistible. Edible rose petals or white chocolate shavings also add an elegant touch. These garnishes create a balance of flavor and presentation that is sure to impress your guests.
Side Dishes
This cheesecake shines on its own but pairing it with a light fruit salad or a small cup of freshly brewed coffee elevates the experience. A drizzle of salted caramel or a scoop of vanilla bean ice cream will add tasteful contrasts that make every bite unforgettable.
Creative Ways to Present
For a stunning presentation, try layering slices on dessert plates with a swirl of raspberry coulis or a mint sprig for color contrast. Alternatively, serve mini versions in individual jars for a charming and portable dessert option. These creative twists make the Homemade Red Velvet Cheesecake Recipe perfect for all kinds of occasions, from casual get-togethers to fancy dinner parties.
Make Ahead and Storage
Storing Leftovers
Once you’ve baked this Homemade Red Velvet Cheesecake Recipe, you can store leftovers covered in the refrigerator for up to 3-4 days. Keep it well wrapped or in an airtight container to maintain moisture and prevent it from absorbing other fridge odors. This way, you can savor every indulgent slice without worry.
Freezing
If you want to enjoy your cheesecake later, it freezes beautifully. Wrap individual slices tightly in plastic wrap and place them in a freezer-safe container or bag. Frozen slices keep well for up to 1 month. When you’re ready to enjoy, thaw them overnight in the refrigerator for the best texture and flavor balance.
Reheating
Cheesecake is best served chilled, so reheating is not usually recommended. However, if you prefer it slightly warmed, allow slices to come to room temperature naturally for about 30 minutes before enjoying. Avoid microwaving, as it can change the texture and melt the frosting too much.
FAQs
Can I use regular cocoa powder instead of Dutch-processed?
Yes! Regular unsweetened cocoa powder works perfectly in this Homemade Red Velvet Cheesecake Recipe and provides that lovely chocolatey depth. Just make sure it’s unsweetened for the best balance with the sugar.
What if I don’t have red food coloring? Can I skip it?
The red food coloring gives this cheesecake its signature red velvet look, but if you prefer not to use it, the flavor will still be rich and delicious, just without the vibrant color. You could try natural alternatives like beet juice for a subtle tint.
How do I avoid cracks on my cheesecake top?
The key is baking with a water bath and gradual cooling. The water bath keeps the temperature even and moist, preventing cracks. Also, avoid overbeating the eggs and don’t open the oven door during baking.
Can I make this recipe gluten-free?
Absolutely! Simply substitute the Oreo cookies with a gluten-free chocolate cookie or graham cracker crust. The rest of the ingredients are naturally gluten-free, making this recipe adaptable for special diets.
Is it necessary to use the springform pan with foil?
Yes, wrapping the springform pan with foil prevents water from the water bath from seeping in, which could ruin the crust and texture. It’s a simple step that ensures the perfect bake.
Final Thoughts
This Homemade Red Velvet Cheesecake Recipe is truly a winner for anyone who adores that perfect harmony of rich creaminess and chocolatey sweetness with a pop of stunning color. It’s easier to make than you might think and guaranteed to wow both your taste buds and your guests. I cannot recommend making it soon enough — get baking and treat yourself to a slice of pure deliciousness!
“`
Print
Homemade Red Velvet Cheesecake Recipe
- Prep Time: 30 minutes
- Cook Time: 1 hour 10 minutes
- Total Time: 6 hours 40 minutes
- Yield: 12 servings
- Category: Dessert
- Method: Baking
- Cuisine: American
Description
This Homemade Red Velvet Cheesecake combines the rich, creamy texture of classic cheesecake with the vibrant flavor and color of red velvet cake. Featuring a crunchy Oreo cookie crust and a luscious cream cheese frosting, this dessert is perfect for special occasions or anytime you want a decadent treat.
Ingredients
Crust
- 2 ½ cups (250 g) crushed Oreo cookies (about 30 cookies)
- 5 tablespoons unsalted butter, melted
Cheesecake Filling
- 32 ounces (908 g) cream cheese, softened
- 1 ⅓ cups (267 g) granulated sugar
- ½ cup (42 g) cocoa powder
- 1 cup (227 g) sour cream, room temperature
- 1 tablespoon white vinegar
- 1 tablespoon vanilla extract
- 1–2 ounces red food coloring
- 4 large eggs, room temperature, lightly beaten
Frosting
- 4 ounces (113 g) cream cheese, softened
- ¼ cup (56 g) unsalted butter, softened
- 2 cups (260 g) confectioners’ sugar
- 1 teaspoon vanilla extract
Instructions
- Preheat and Prepare Pan: Preheat your oven to 350°F (175°C). Wrap the bottom of a 9-inch springform pan with two layers of heavy-duty aluminum foil to prevent water from seeping in during baking.
- Make the Crust: Mix the crushed Oreo cookies with melted unsalted butter until well combined. Press this mixture firmly into the bottom and slightly up the sides of the prepared springform pan. Bake the crust for 10 minutes to set, then let it cool.
- Mix the Cheesecake Batter: Reduce the oven temperature to 300°F (150°C). Beat the softened cream cheese until smooth and creamy. Gradually add granulated sugar and cocoa powder, mixing thoroughly. Add sour cream, white vinegar, vanilla extract, and red food coloring; mix until fully incorporated. Gently fold in the lightly beaten eggs, being careful not to overmix.
- Assemble and Bake: Pour the cheesecake batter over the cooled Oreo crust in the springform pan. Place the springform pan inside a larger roasting pan and pour boiling water into the roasting pan until it reaches halfway up the sides of the springform pan, creating a water bath. Bake for 1 hour at 300°F (150°C). After baking, turn off the oven and leave the cheesecake in the water bath with the oven door closed for an additional hour to finish baking gently.
- Cool and Chill: Remove the springform pan from the water bath and let the cheesecake cool on a wire rack. Once cooled, refrigerate it for at least 4 hours or overnight to set completely.
- Prepare Frosting and Serve: For the frosting, beat softened cream cheese and unsalted butter until creamy. Gradually add confectioners’ sugar and vanilla extract, mixing until smooth. Spread the frosting evenly over the chilled cheesecake before serving.
Notes
- Using a water bath prevents cracks and ensures smooth cheesecake texture.
- Room temperature ingredients help achieve a smooth batter.
- Adjust red food coloring intensity according to your preference for color vibrancy.
- Make sure to wrap the springform pan bottom tightly to avoid water leakage.
- Refrigerating overnight improves the flavor and texture.
- Store leftover cheesecake covered in the refrigerator for up to 4 days.

